If you’re looking for useful Canva tips and tricks to help you up your content creation and design workflow then you’re in for a treat.
We’ve out together a list of 25+ tips to help you do some awesome things with Canva.
Let’s dive in.
Jump to a specific section:
- Remove video backgrounds
- New shapes & features
- Draw in Canva
- Quick create
- Use shortcuts
- New photo effects
- Create websites
- Create mockups
- Copy & paste styles
- Style & shuffle
- Create whiteboards
- Edit PDFs
- Turn text into an image
- Easily create tables
- Quickly share designs to your phone
- Find secret frame elements
- Copy or merge existing designs
- Embed social media posts
- Find product display backgrounds
- Embed your designs on websites
- Use presentation layouts
- Find more elements from a specific creator
- Quickly create QR codes
- Star templates and elements
- Change the color of PNGs
- Find and replace text
- Use awesome text effects
1. Remove video backgrounds
You’ve probably already heard about the image background remover in Canva, but what you might not have come across yet is the video background remover which offers the same functionality but for video elements.
To use it simply follow these steps:
- Select a video element
- Go to ‘Edit video’
- Click ‘Remove background’
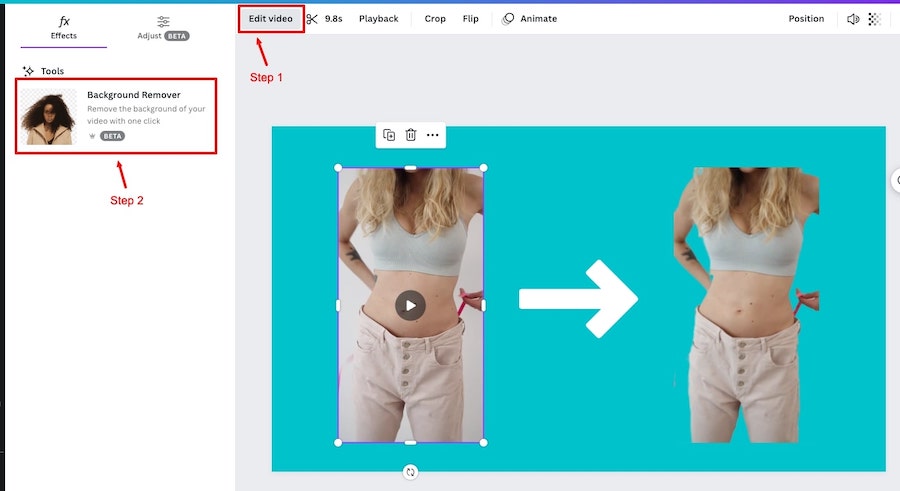
It has to be said that this is a very new feature, so it’s not completely accurate all the time. If you’re using a video with a busy background it’s unlikely to work at the moment.
However, if it’s a simple video background (e.g. one color) it should work. Canva will hopefully continue to improve this feature.
It’s also only available to Canva Pro users at the moment.
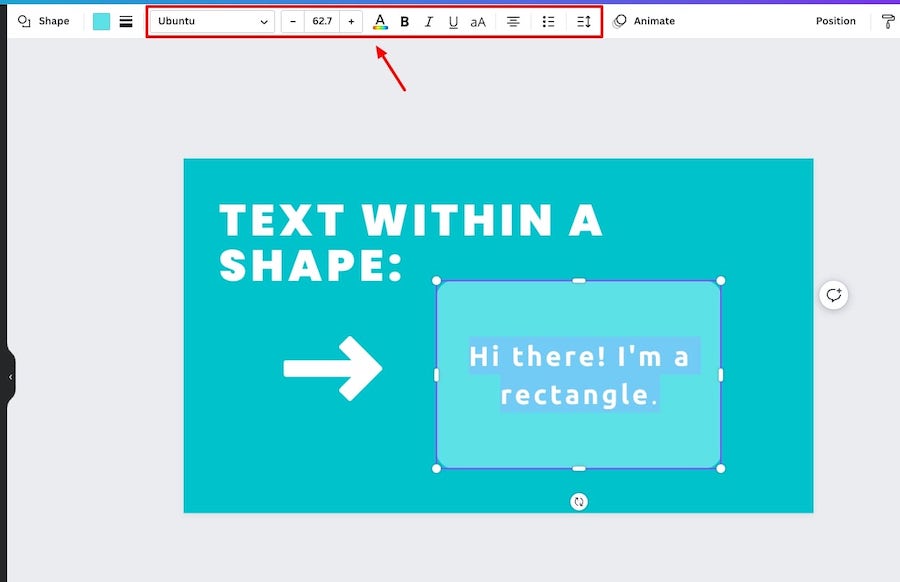
2. New shapes & features
When you add a shape element to the editor on Canva, you now have the option to add text within the shape. You also get the classic text customization options including font, size, color, etc.:
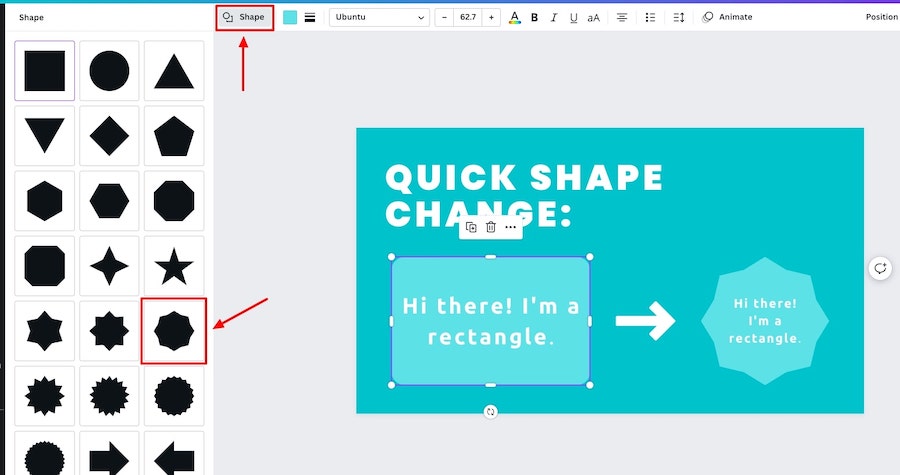
Canva also allows you quickly switch shapes out for a different type. All you need to do is click on the shape that you want to change the shape of, go to ‘Shape’ via the top panel and then select your new shape:
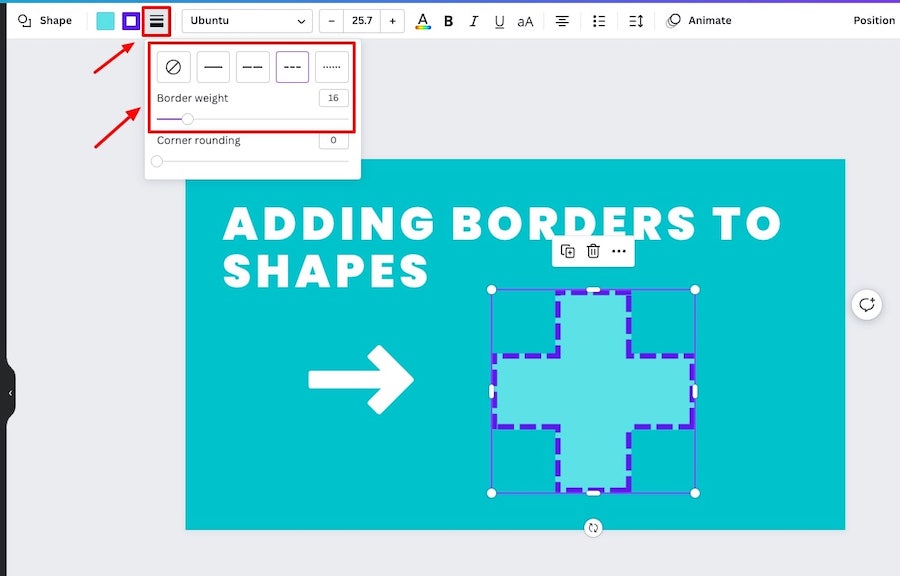
If you want to add borders to shapes you can do that too. Again you simply need to select the shape element that you want to alter, click on the border style in the top panel and choose how you want the border to look:
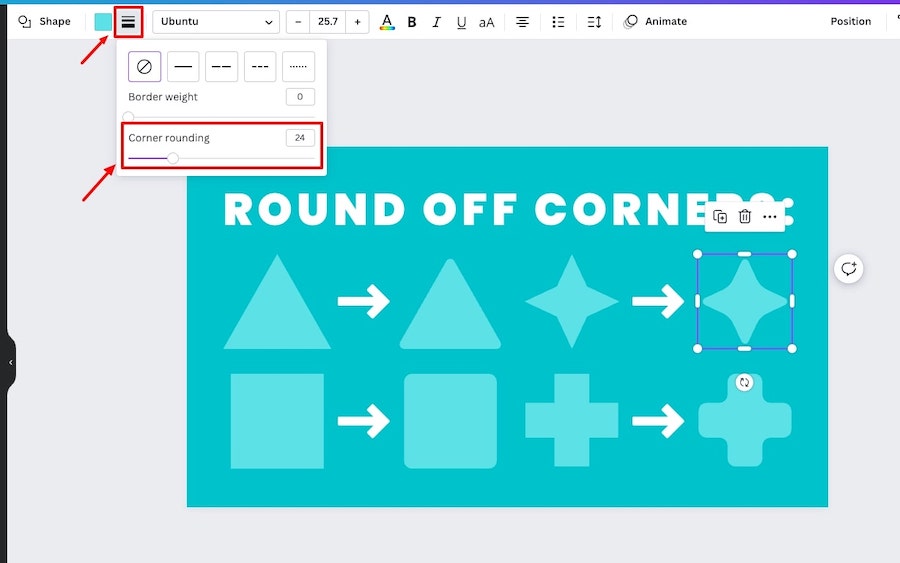
You can also round off the corners of shapes in Canva. The process is very simple, you just need to select the shape element that you want to alter, go to the border style area again, and choose how much corner rounding you want to apply:
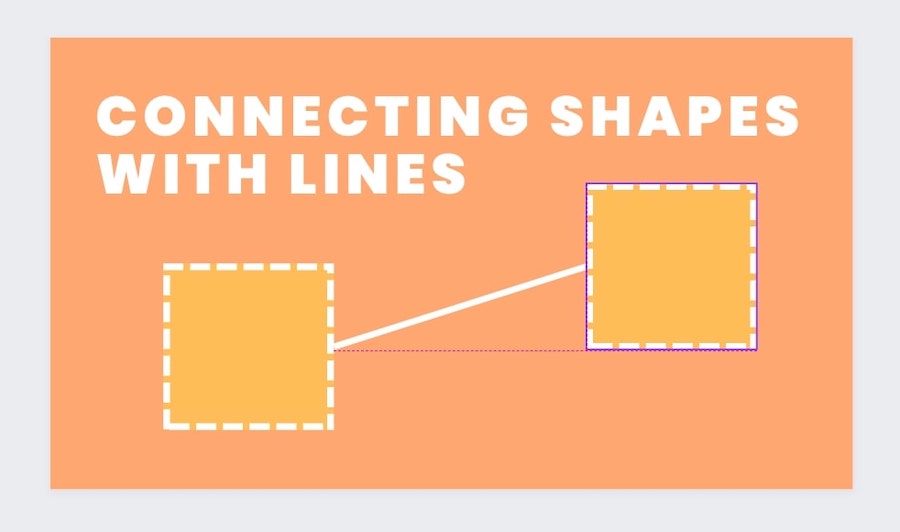
When you hover a line element near a shape you will now see ‘connection’ dots appear. Dropping the line onto one of the connecting dots will connect the two elements, and you can do the same with the other end of the line to another shape.
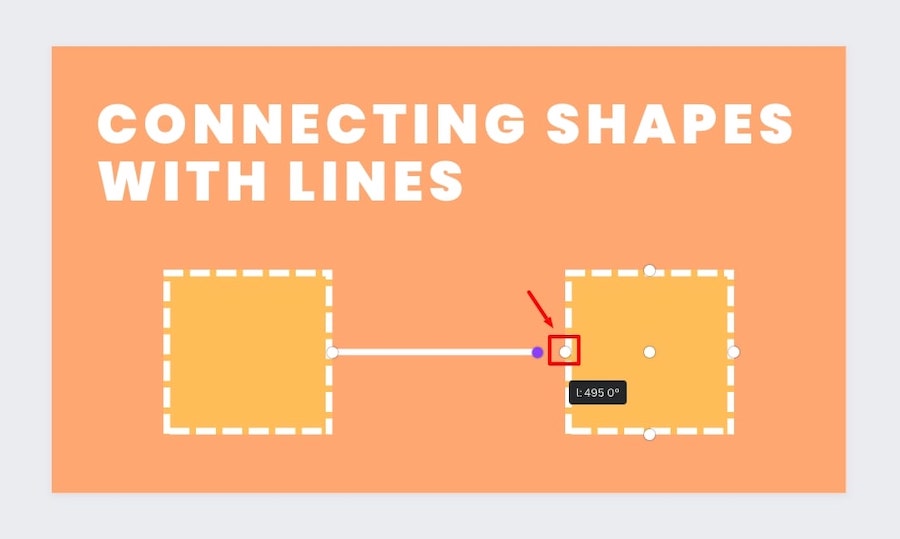
When you move the shapes, the line will adjust along with the shape – which is really useful if you’re creating charts and visualizations. You can actually do the same lines with other types of graphic elements too:
3. Draw in Canva
Canva has introduced their ‘Draw’ app, which allows you to draw on existing designs or on a blank canvas.
Here are the steps to use it:
- Go to ‘More’ at the bottom of the side panel in the Canva editor
- Find the ‘Draw’ app and click it to add to your editor
- Choose your drawing utensil (e.g. pen, highlighter, etc.)
- Choose the size, transparency, and color
- Get drawing on the canvas!
- Click done on the top panel when you’re finished drawing
- You’ll now have an element that you’ve drawn
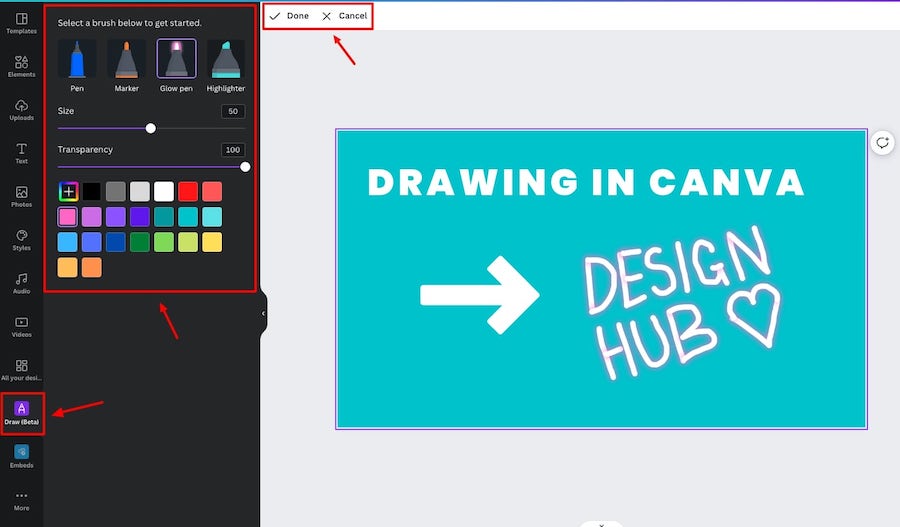
Whatever you draw it becomes its own element that you can utilize in the same way as you can with any other Canva design element, so you can create some unique looking elements.
Note: this feature isn’t available on mobile yet.
For a full step by step breakdown of this feature check out this article: How to draw in Canva
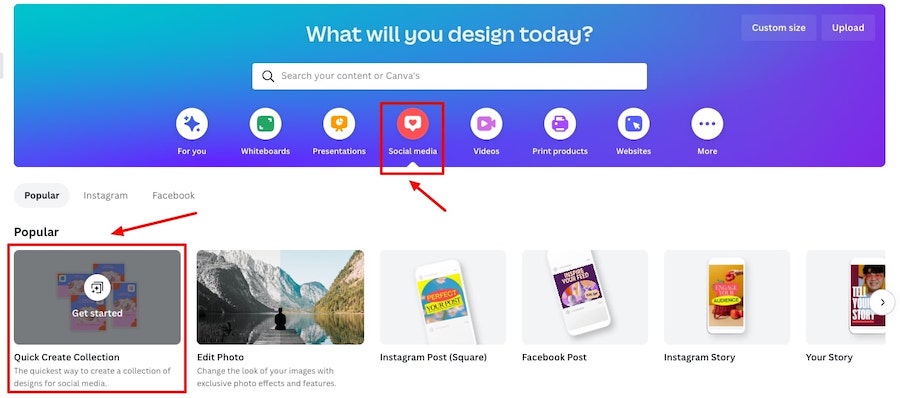
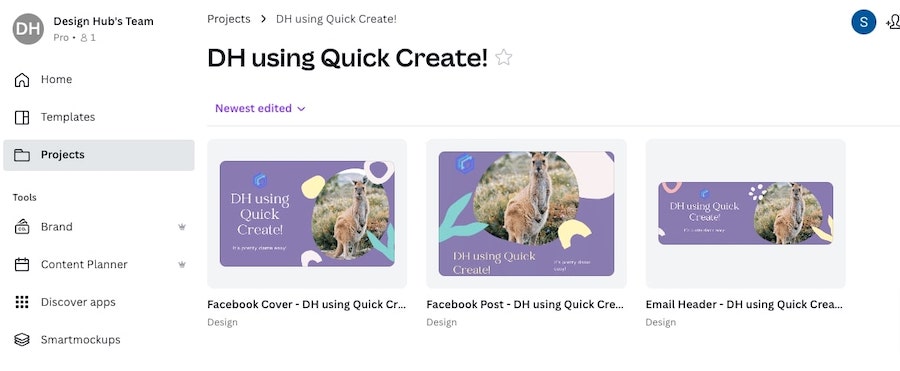
4. Quick create
If you want to create a set of designs but in different formates and dimensions with a few clicks then you should check out Canva’s ‘Quick’ Create’ tool.
To access it go to your homepage, go to the social media section, then click ‘Quick Create Collection’:
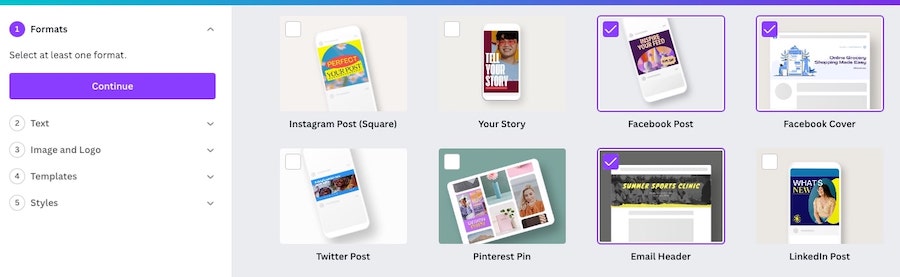
Here are the steps to complete the process:
- Select the placements you want the designs for (e.g. Facebook post, Instagram post, email header, etc.)
- Enter the text
- Add your main image and logo if you want
- Choose your template range (fairly limited at the moment)
- Choose your style – basically color palette
- Click finish
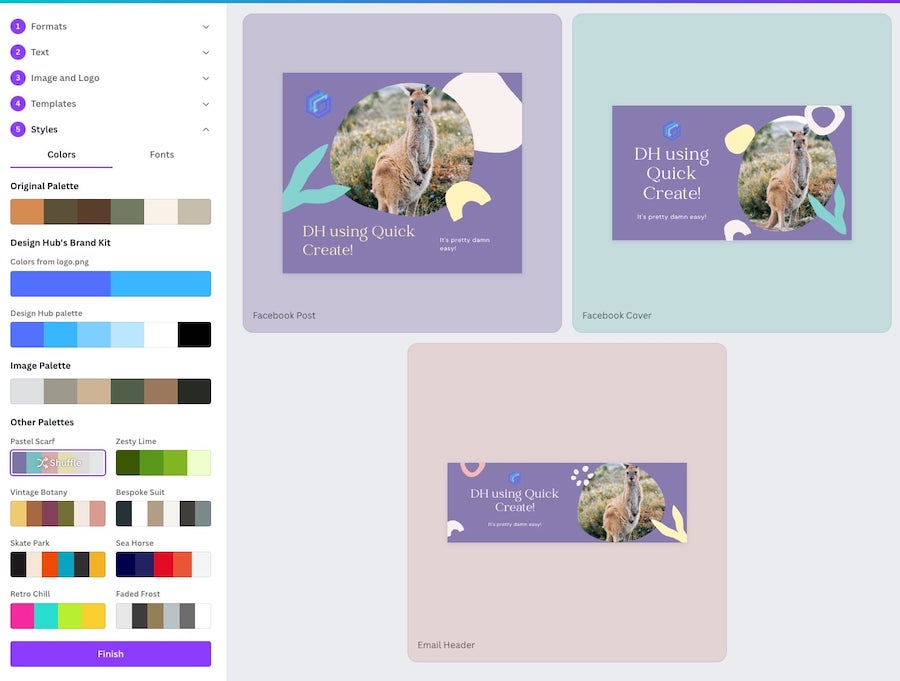
If you want to tweak those designs further you the option to go to your new designs by clicking ‘View my collection’:

This is fairly new feature on Canva, so we expect it to improve further – but it could become a huge time saver for many!
Plus if the designs don’t quite look right, you can modify them after you’ve finished generating them.
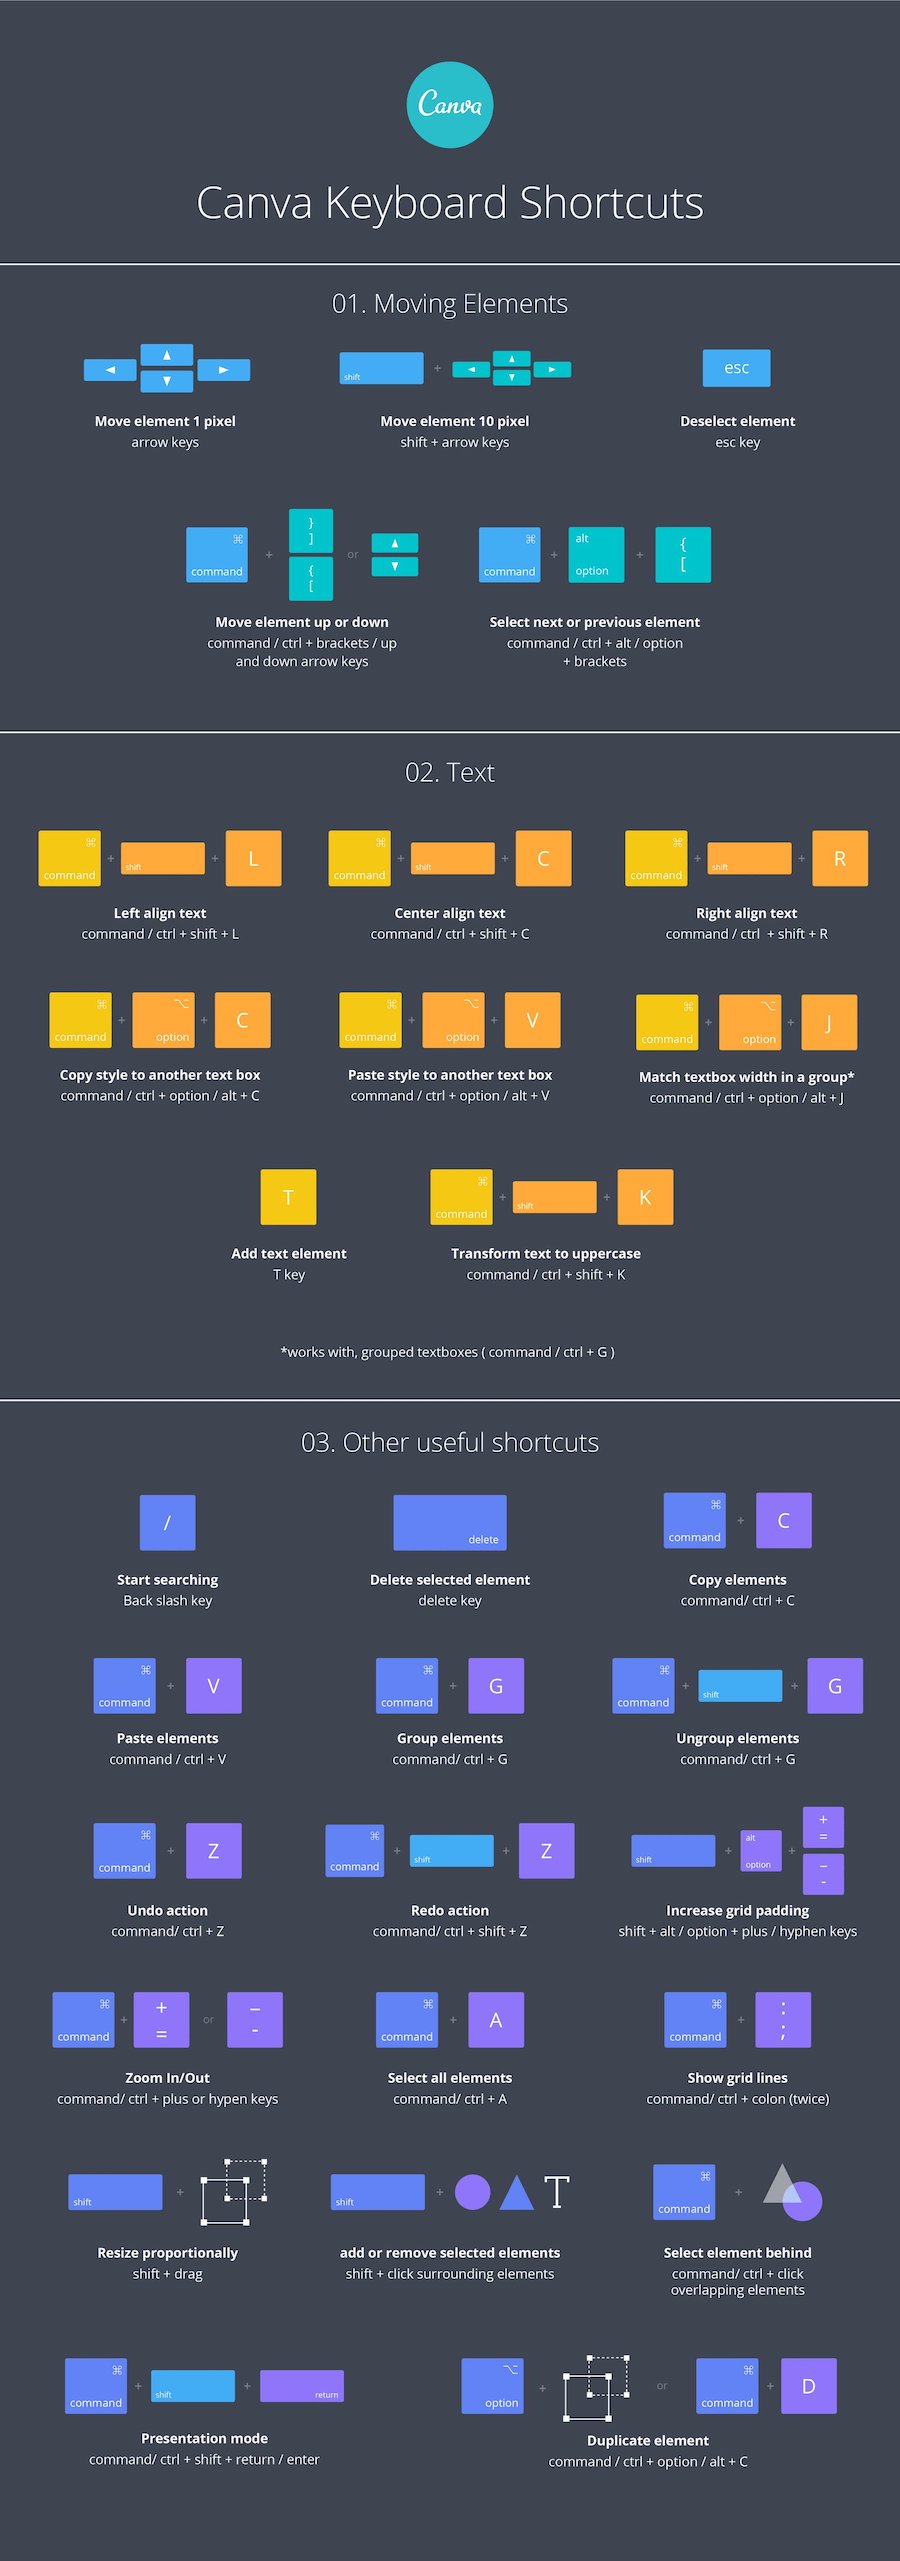
5. Use shortcuts
There are plenty of shortcuts that you can use in Canva, so we’ve put an image with the full range of shortcuts below.
However, here are some of our favourite shortcuts to help up your productivity in Canva:
- Move an element up or down in the layers: CMD/CTRL + [ (move down) or CMD/CTRL + ] (move up)
- Increase/decrease font size: CMD/CTRL + shift + > (increase) or CMD/CTRL + shift + < (decrease)
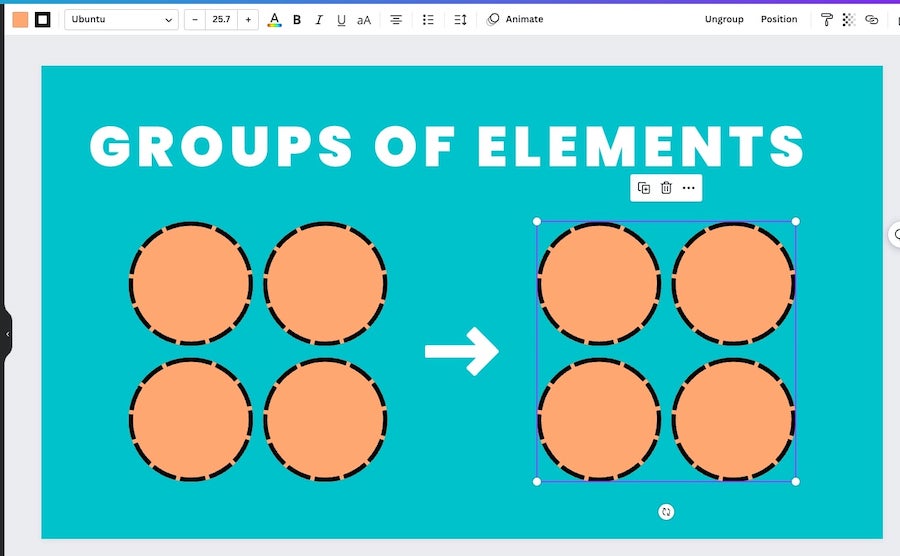
- Group/ungroup elements: Select multiple elements and click CMD/CTRL + G or CMD/CTRL + shift + G to ungroup them
- Tidy up elements: Select the elements you want to align and line up, and click Alt/Option + shift + T and they will be lined up neatly
- Text box: Press T
- Zoom in/out: CMD/CTRL + (zoom in) or CMD/CTRL – (zoom out)
- Quick duplicate: CMD/CTRL + D when the element you want to duplicate is selected
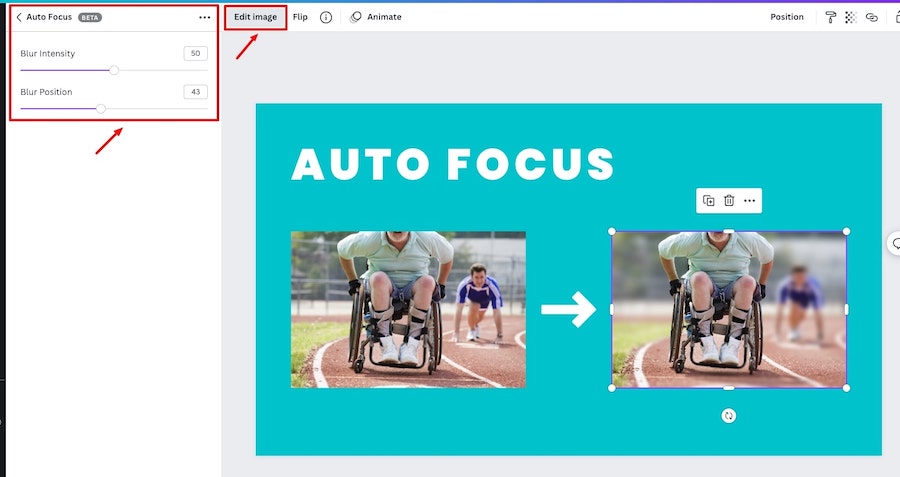
6. New photo effects
Canva has introduced some new photo effects that are pretty awesome.
You can now blur the background of images and whilst keeping the man element of a photo in focus. To do this do the following:
- Select an image
- Go to ‘Edit image’
- Search for ‘Auto Focus’ and add it
- Make your adjustments
- Apply
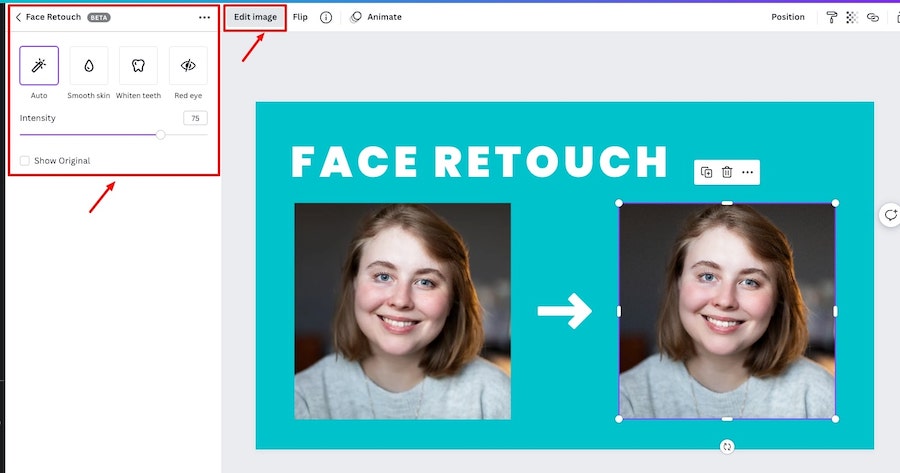
You can go through a similar process to use the ‘Face Retouch’ app which allows you to add ‘enhancements’ to a photo of someones face such as smooth skin, and whiten teeth.
The changes are subtle but you can notice them.
To use it here are the steps:
- Select an image
- Go to ‘Edit image’
- Search for ‘Face Retouch’ and add it
- Make your adjustments
- Apply
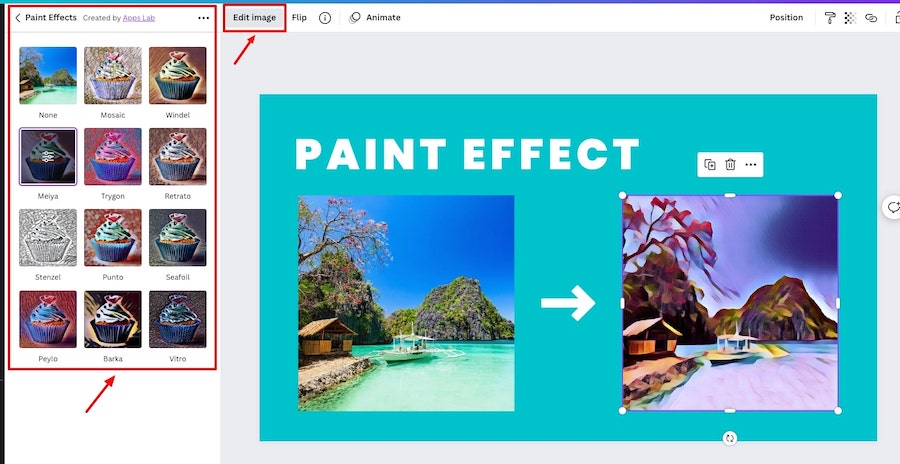
You can also easily make a photo look like a painting. The steps are very similar to the previous two photo effects, here’s how you do it:
- Select an image
- Go to ‘Edit image’
- Search for ‘Paint effects’ and add it
- Choose your paint effect
- Make your adjustments
- Apply
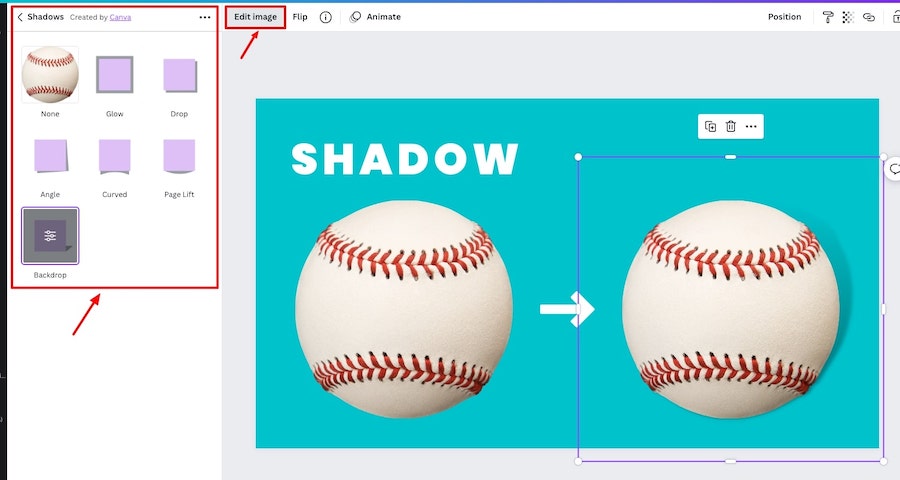
Adding shadows to photos is now very easy in Canva too. These effects typically look between with images with a transparent background but it works either way.
Here’s how you can add shadows:
- Select an image
- Go to ‘Edit image’
- Go to ‘Shadows’ or search for it if you can’t find it
- Choose your shadow effect
- Make your adjustments
- Apply
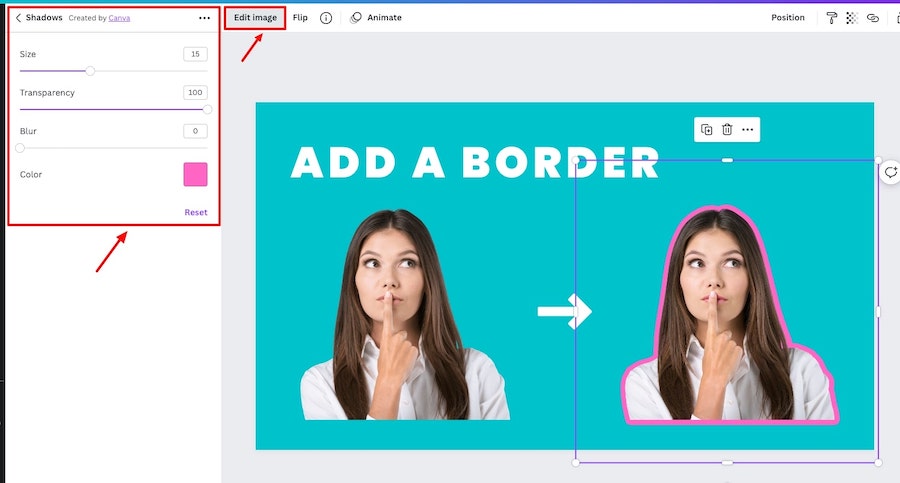
If you want to add a border around an image (e.g. putting a border round a person for a YouTube thumbnail) you can easily do that with Canva now.
Here’s how:
- Select an image
- Go to ‘Edit image’
- Go to ‘Shadows’ or search for it if you can’t find it
- Choose the ‘Glow’ effect and then filter it
- Adjust the transparency to full
- No blur
- Make the border as big as you want
- Choose the color for your border
- Apply
Related articles:
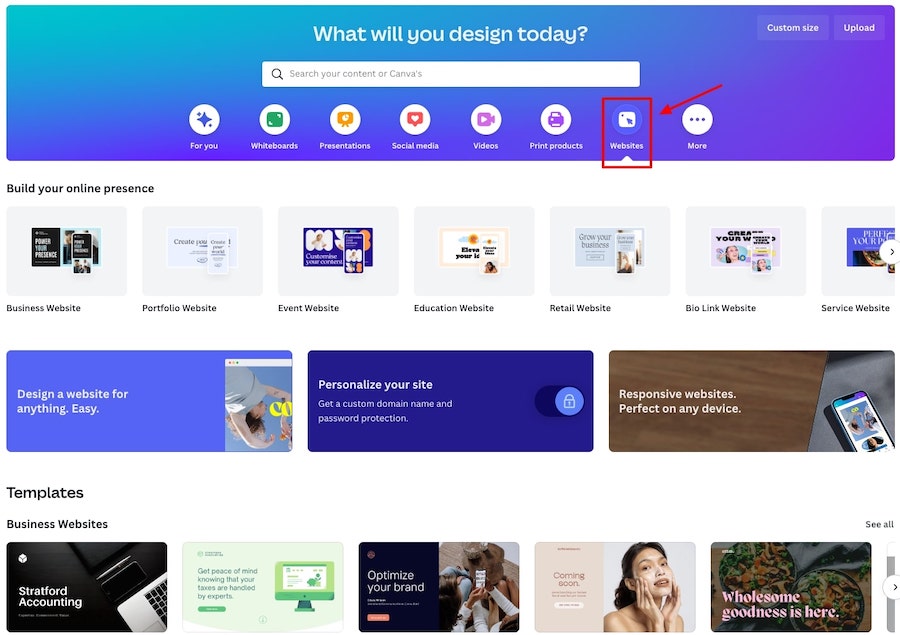
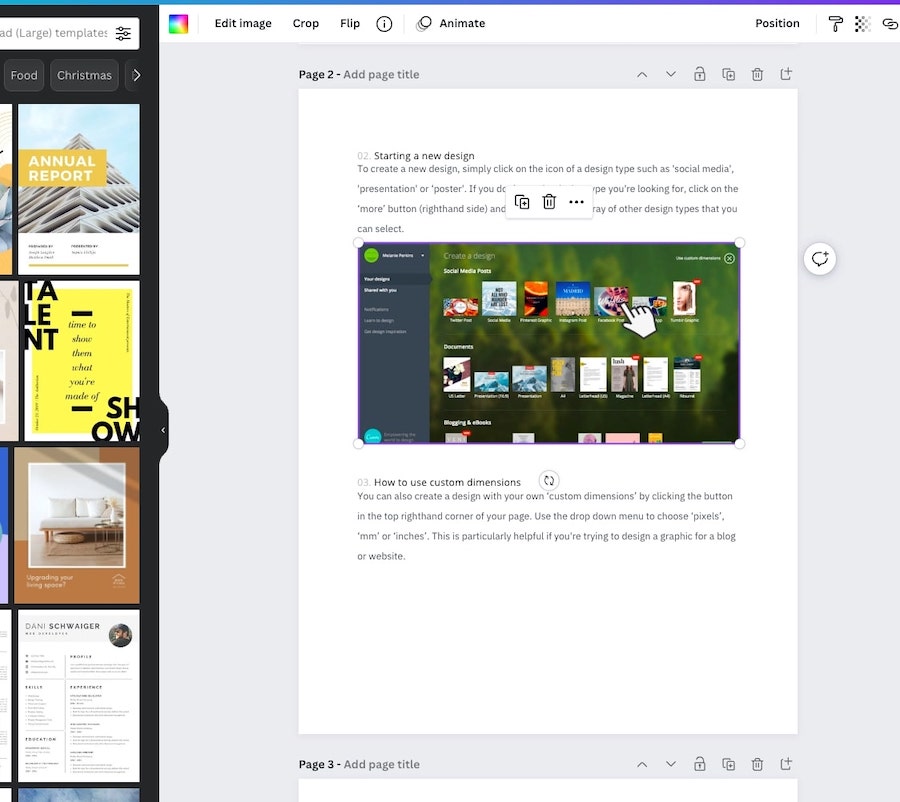
7. Create websites
Canva is continuing to improve it website creation offering.
We wouldn’t say that it’s a great platform for creating fully fledged websites at the moment, but if you’re looking to create a one-page website, portfolio page or a landing page it works really well, and you don’t need any coding or web development skills whatsoever to use it.
Here’s how to create a website with Canva:
Step 1: Go to the websites section via your Canva homepage:
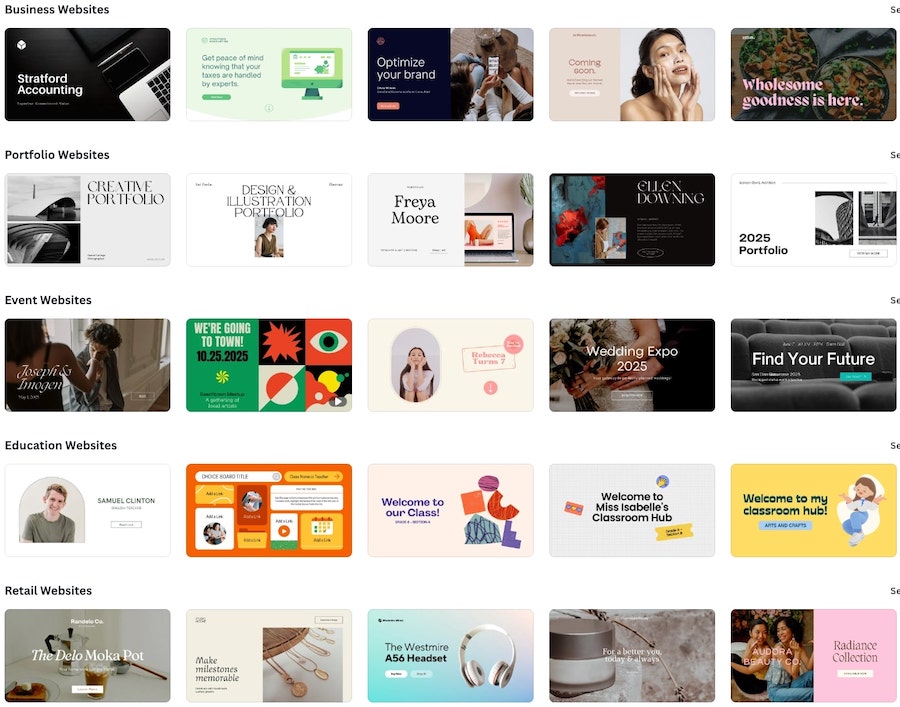
Step 2: Either start a website design from a blank canvas by choosing one of the presets e.g. ‘Business Website’, ‘Portfolio Website’, ‘Bio Link Website’, etc. or scroll down the page and choose a predesigned website template that you like. There are plenty to choose from:
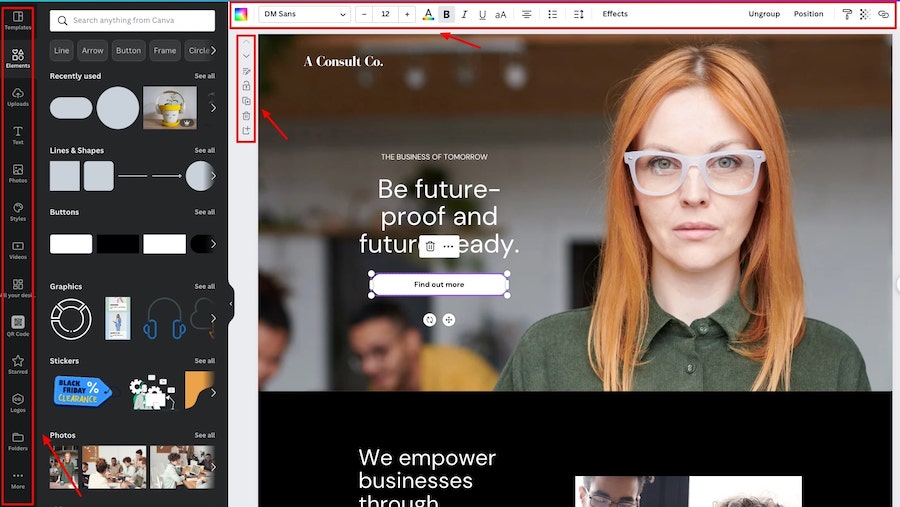
Step 3: Customize the site design to your liking. The customization options are the same as you get with any other Canva design:
Step 4: Preview your website design. You can see how it looks on the desktop and responsive mobile version too:

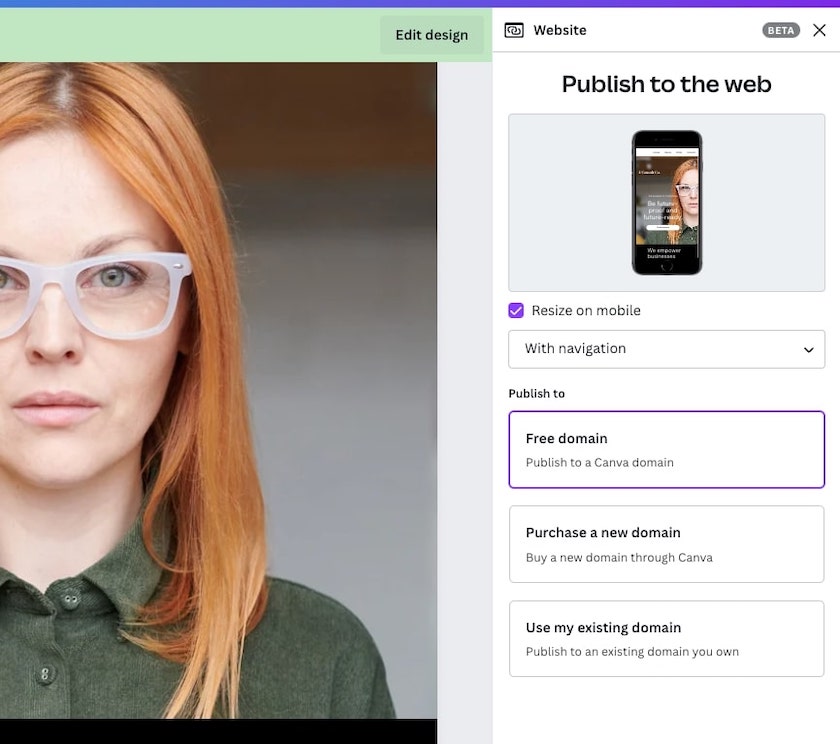
Step 5: Publish your website. You can either publish using a Canva domain name, or you can a custom domain name from Canva or use an existing on that you own:
Note: you can also convert your PDFs into websites via Canva now too, and also Canva even gives you website analytics including visits, clicks, and more!
8. Create mockups
You can easily create mockups in Canva (that links to an article that takes you through the process in detail).
There are three ways to create mockups in Canva.
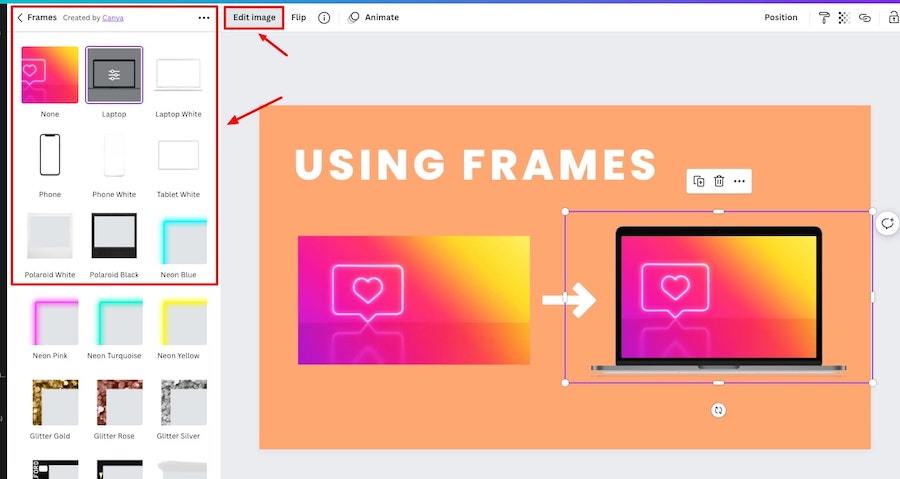
The first option is to use frames. To use these follow the steps below:
- Select an image
- Go to ‘Edit image’
- Search for ‘Frames’ and go to it
- Choose your frame
- Make your adjustments
- Apply
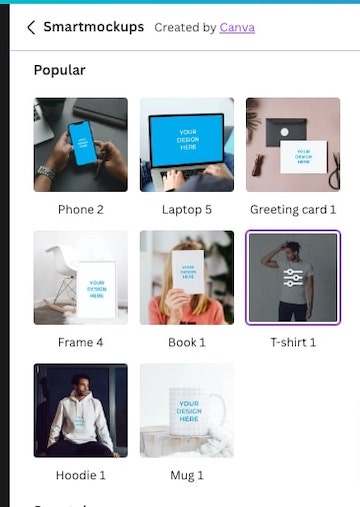
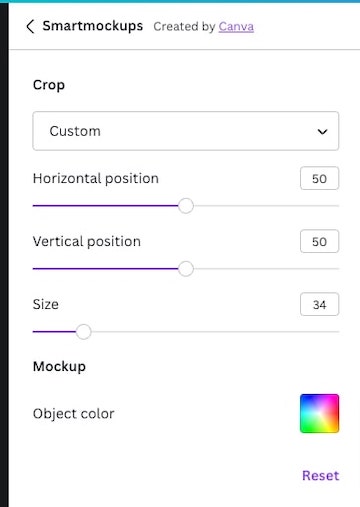
The next option is to use the Smart Mockups templates on Canva. Here’s how to do that:
- Select an image
- Go to ‘Edit image’
- Go to ‘Smartmockups’ or search for it
- Choose the mockup template that you want to use
- Make adjustments to make sure your design looks good with the mockup
- Apply
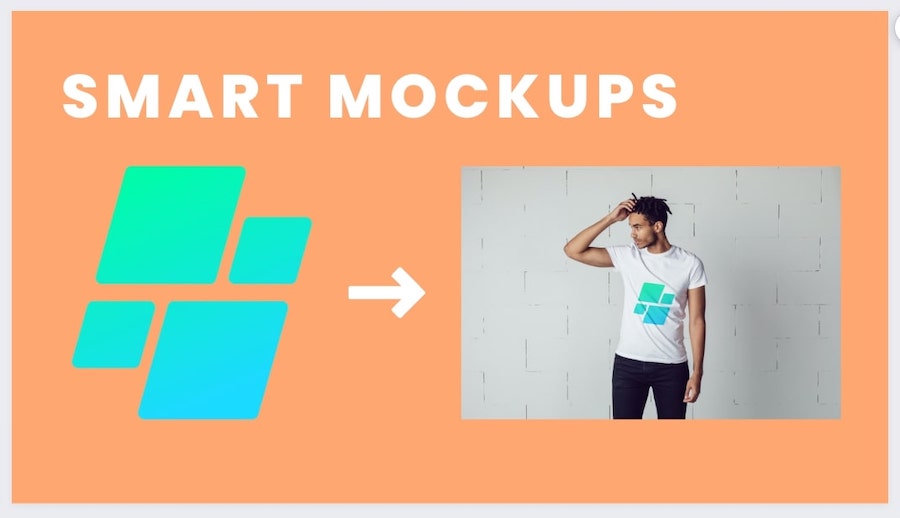
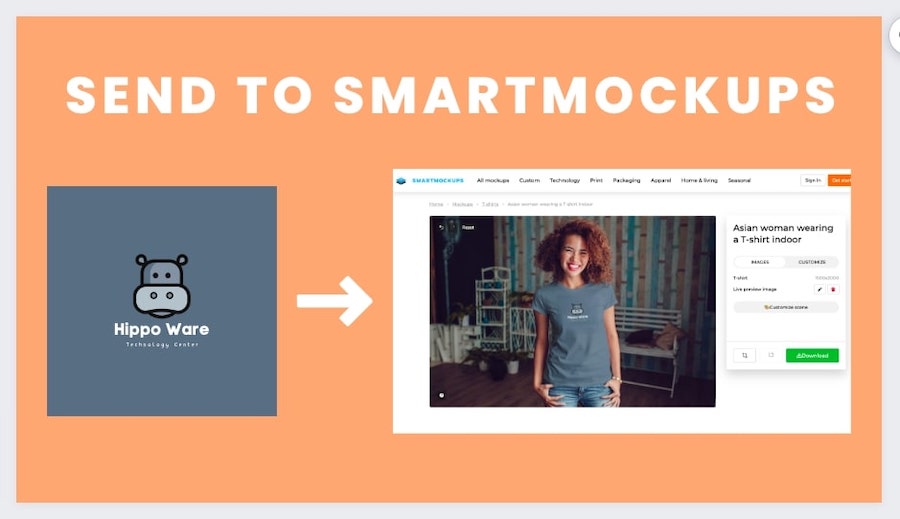
The third option is to send your Canva designs to your Smartmockups account (you’ll have to create one).
Creating your mockups on Smartmockups just gives you more customization options, and they have quite a few free templates on offer too.
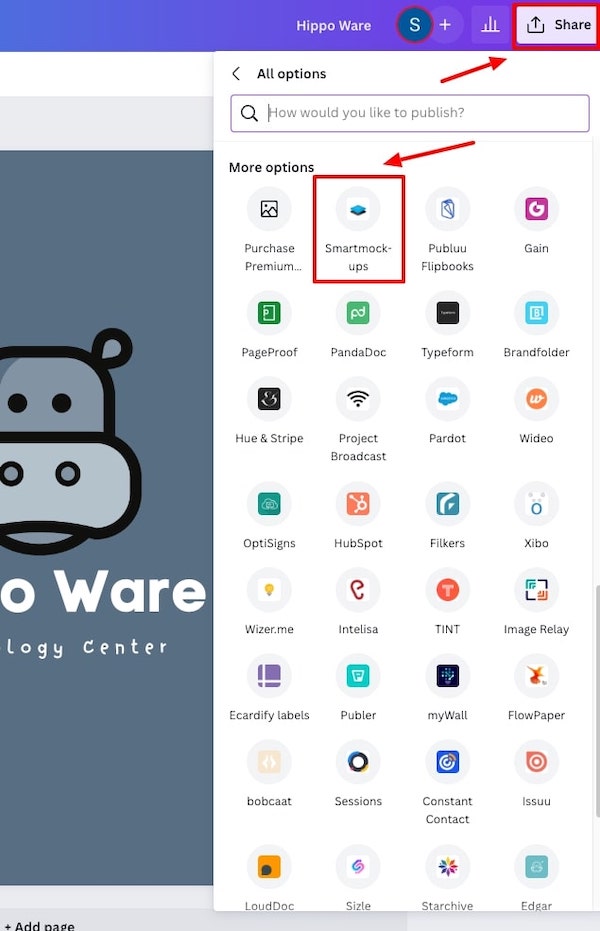
Here’s how to create a design in Canva then create a mockup with in Smartmockups:
- Create a design
- Click ‘Share’ then ‘More’
- Choose Smartmockups
- Save
- Then click ‘View in Smartmockups’
- Go to the new tab that opened (Smartmockups)
- Choose a mockup template
- Customize it
- Download

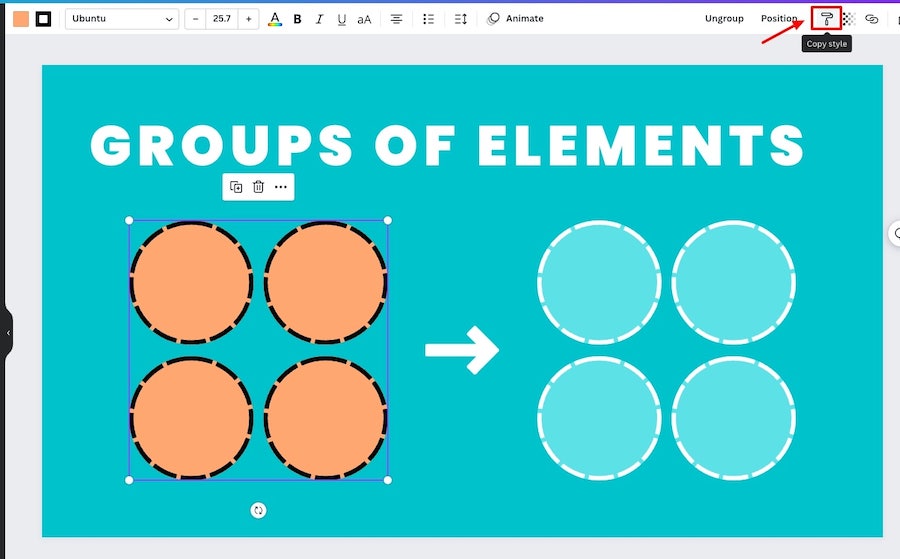
9. Copy & paste styles
You can quickly copy the style of one element and pass it on to another one.
Here’s how to do this quickly:
- Select the element you want to copy
- Click on the copy style button
- And then click on the element that you want to pass the style on to
- That’s it!
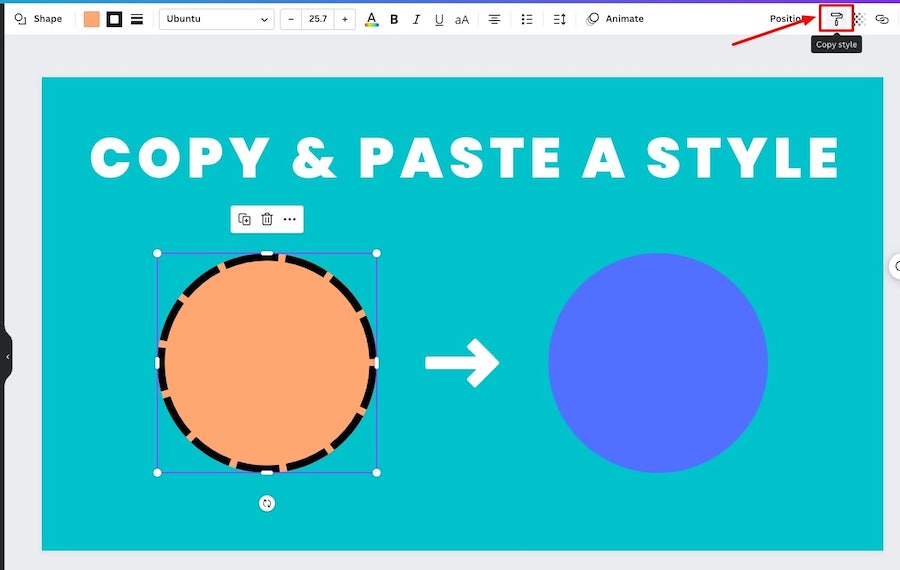
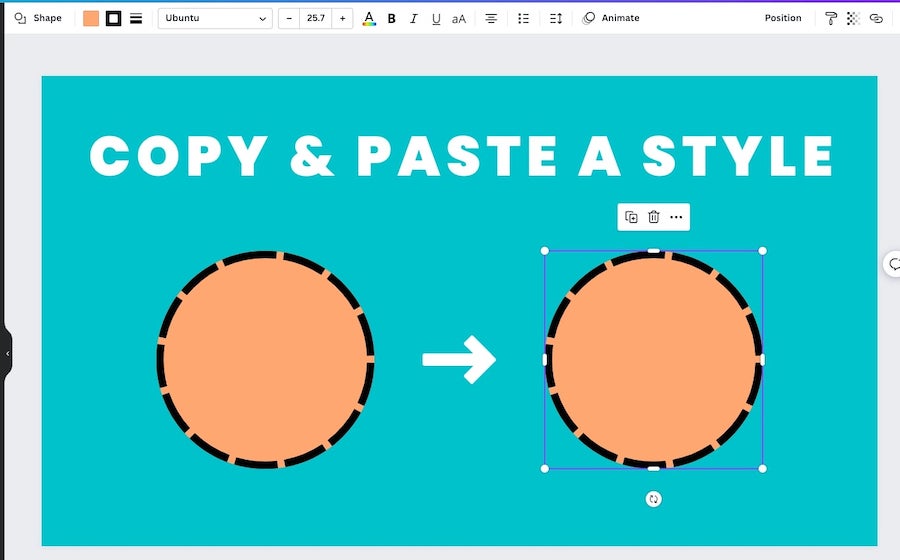
You can also use shortcuts to do the same thing:
- CMD/CTRL + Option/Alt + C to copy the style
- CMD/CTRL + Option/Alt + V to paste the style
And it works with fonts, lines, photos, and other graphic elements too, not just shapes! You can even do it with groups of elements.
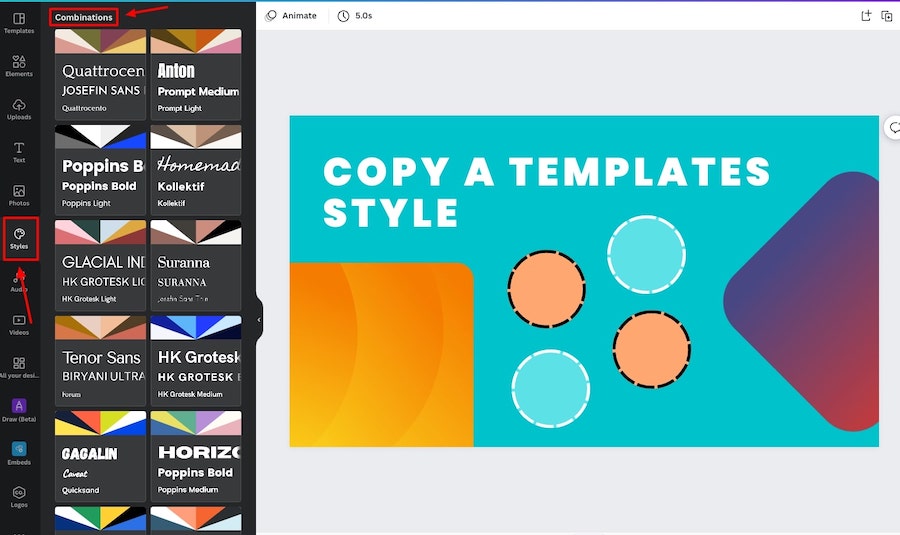
10. Style & shuffle
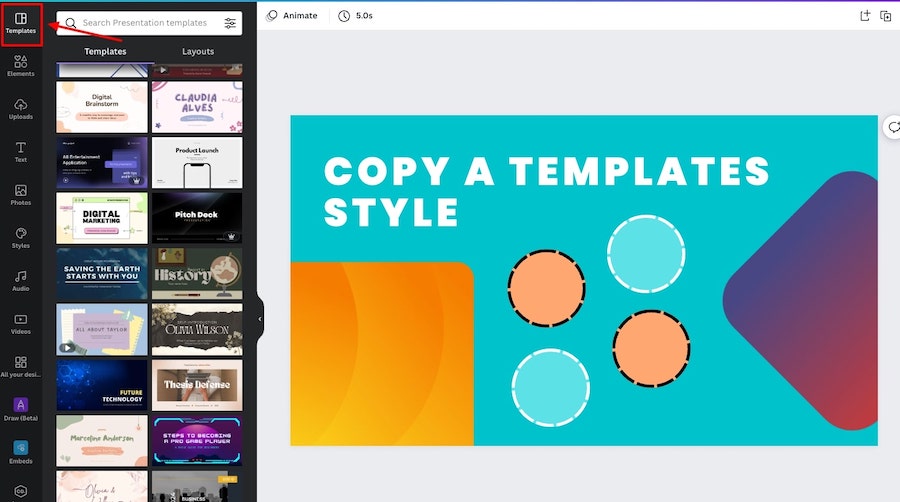
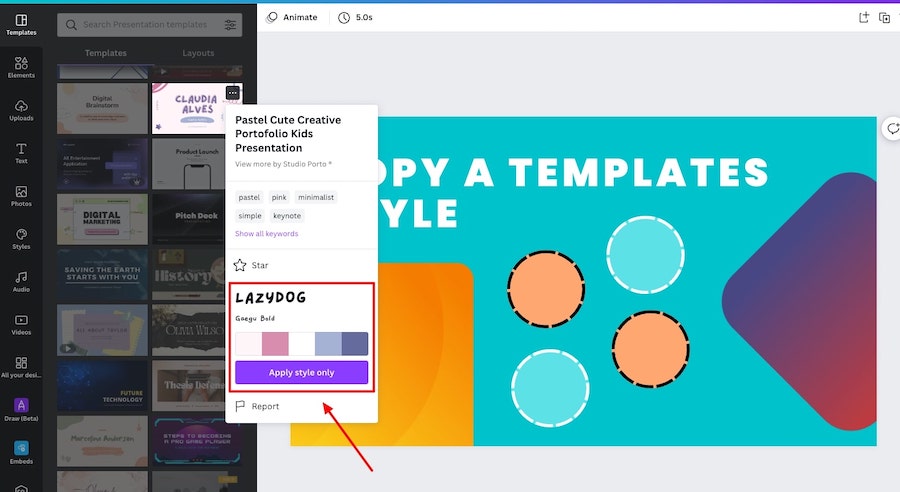
You can copy styles from other templates that you like, to see how they look on your existing design.
Here’s how to do that:
- In the editor, go to the template tab
- Click the three dots overlay on the template
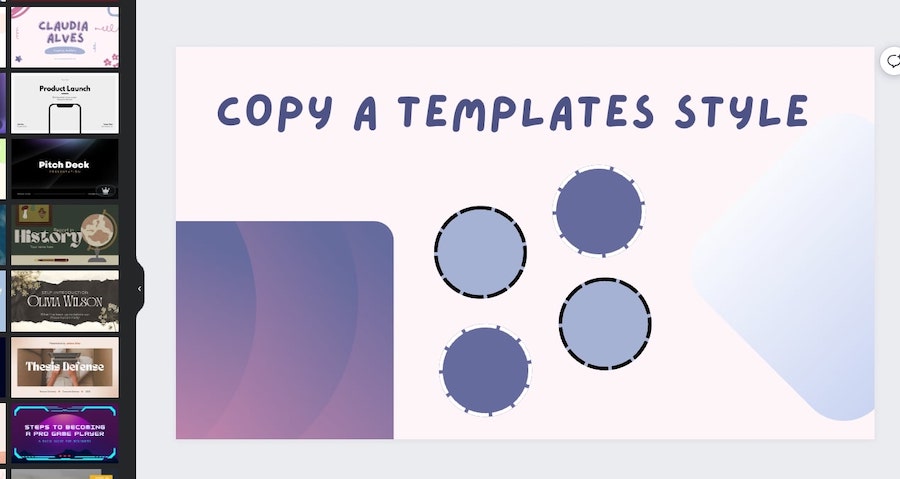
- Click ‘Apply style only’
- That template’s style will then be applied to your current design
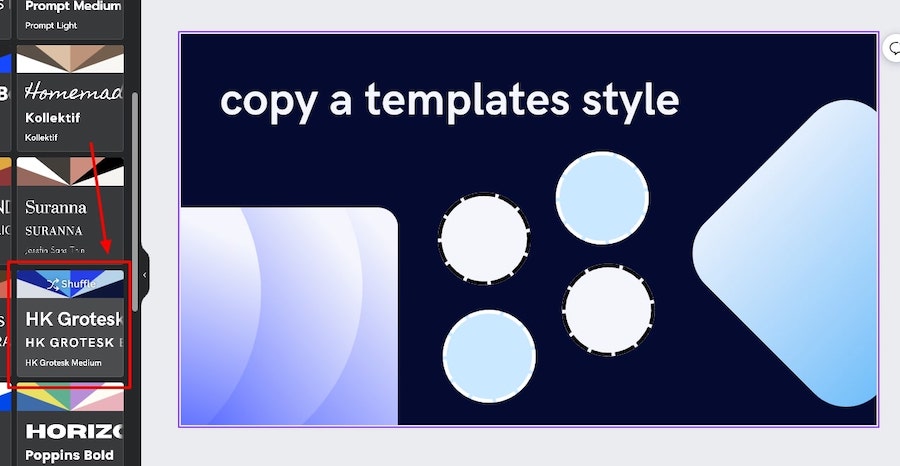
You can also go to the ‘Styles’ tab and choose a new suggested font for your design, or a new color palette, or a new combination of both:
It’s a very quick way to test out a whole new look for your design. You can even shuffle the new color palette to see which colors work best with the various elements of your design, and once your happy with how it looks you can also apply it other pages within your design if you want to:
11. Create whiteboards
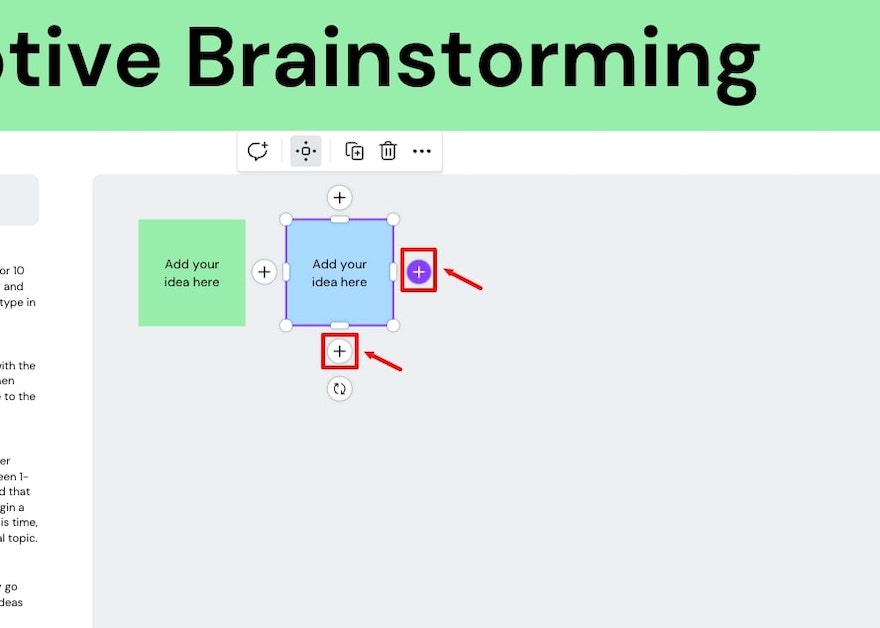
If you’re looking for a fantastic way to interact, collaborate, and strategize with your team then the new whiteboard feature and templates on Canva will be of interest to you.
There’s project journeys, brainstorming templates, voting boards, mindmaps, and more. Plus plenty of whiteboard graphics which you can duplicate using the ‘Quickflow’ option that duplicates elements but in place rather than in a random spot:
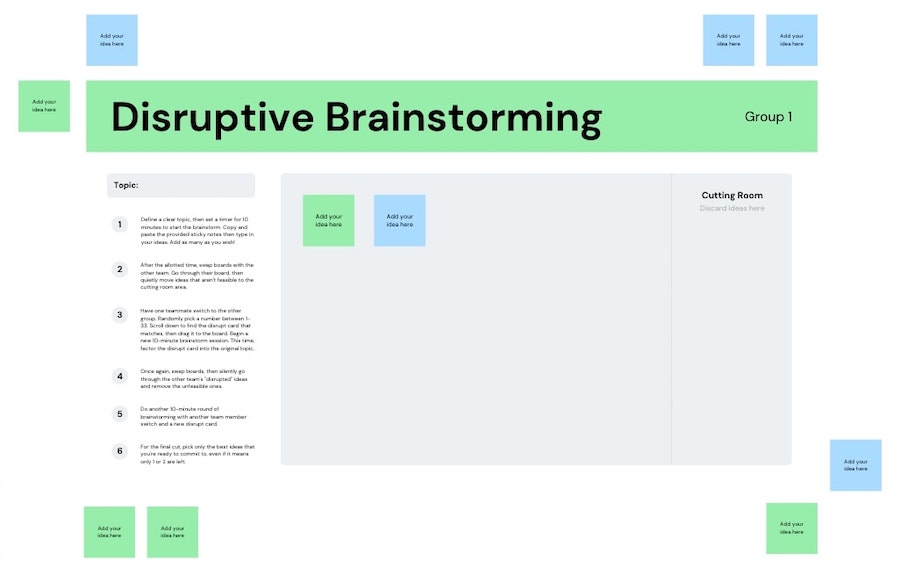
The whiteboard templates come with a timer option too so everyone who’s taking part in the presentation or creation of it can have an equal time slot. You can export the whiteboard as a PDF, JPG, or even as a video.
12. Edit PDFs
You can edit PDFs in Canva, even if it’s a flat file (doesn’t have layers) you can upload it to Canva and it will scan the document and then make it and all the elements within it editable.
Here’s how to do it:
- Upload your PDF file to the Canva homepage
- Open the file once it’s loaded
- Start editing it like any other design
This new feature means you can now easily combine PDF files in Canva too!
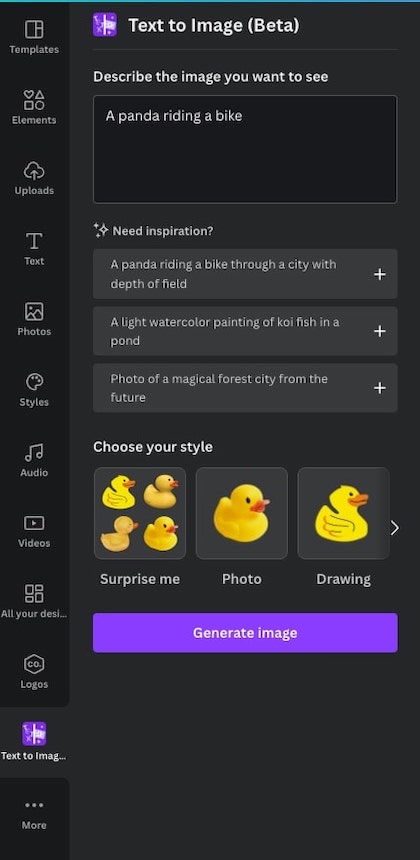
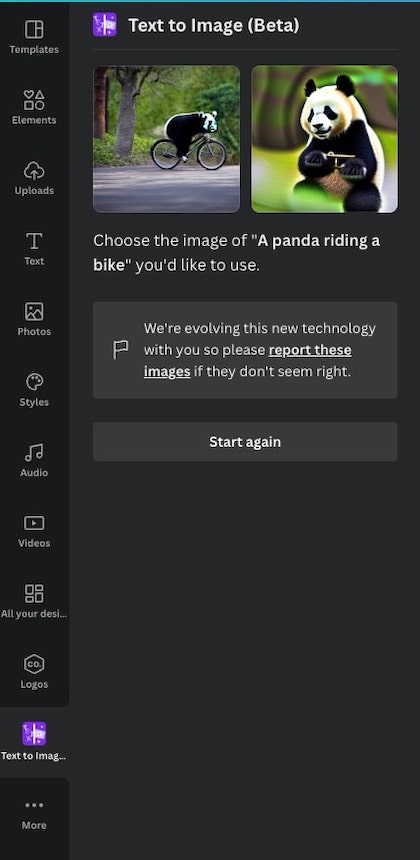
13. Turn text into an image
Generate new ideas and images using Canva’s new ‘Text to image’ feature.
From a simple description you can get photos, illustrations, concept art, and more. It’s worth keeping in mind that this is a fairly new feature but Canva will no doubt continue to improve it.
Here’s how to use it:
- Go the Canva apps area by clicking ‘More’ in the left side panel
- Find and add ‘Text to image’
- Put in a short description
- Choose your style (photo/drawing)
- Generate image
- You can now use that generated image
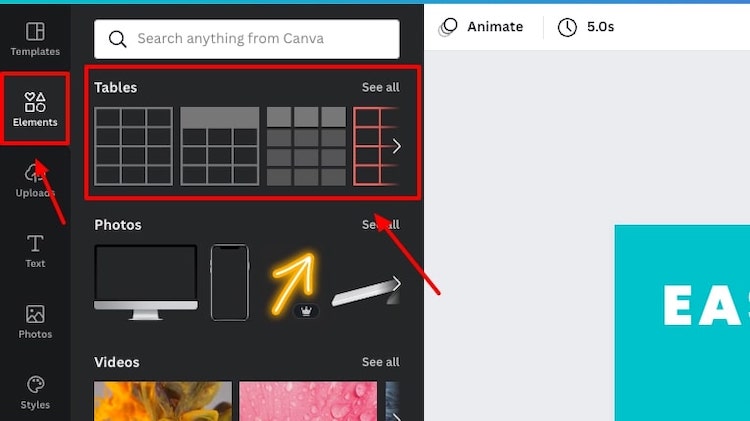
14. Easily create tables
If you’re looking to quickly create tables in your designs you’re in luck. There is now a tables section in the elements tab in the Canva editor:
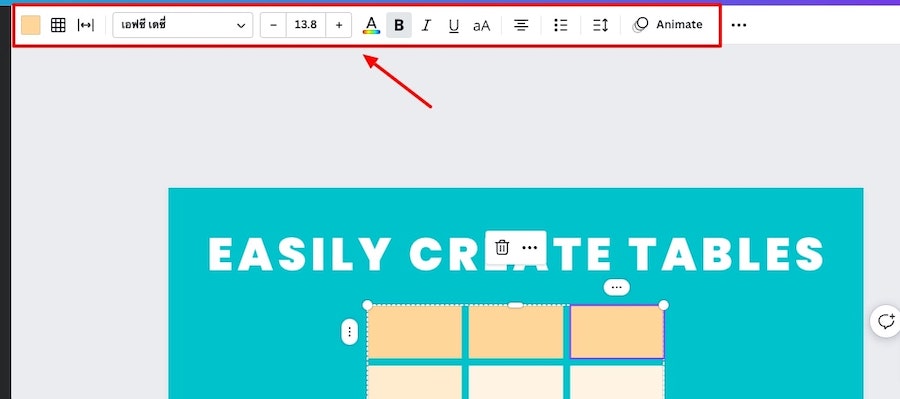
You get all the customization options you would expect including being able to change the font, text size, colors, and the table border and spacing:
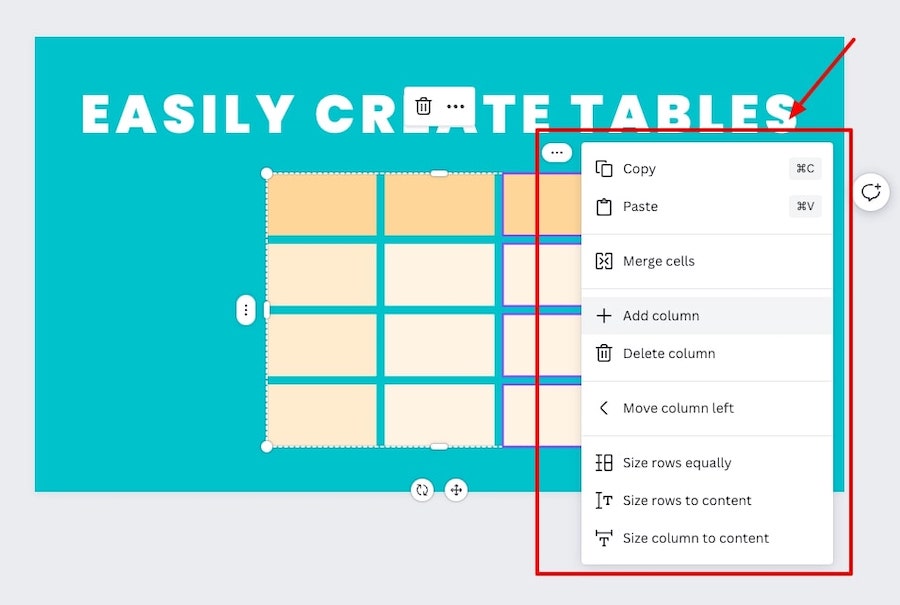
You can further customize the table by selecting one one of the 3 dot toggles on the element and choosing one of the option there (e.g. add/delete row, column, etc.):
You can also select data from another sources e.g. google sheets, or excel – copy what you need from it, paste it into Canva and it will produce a table with that data you pasted – super helpful!
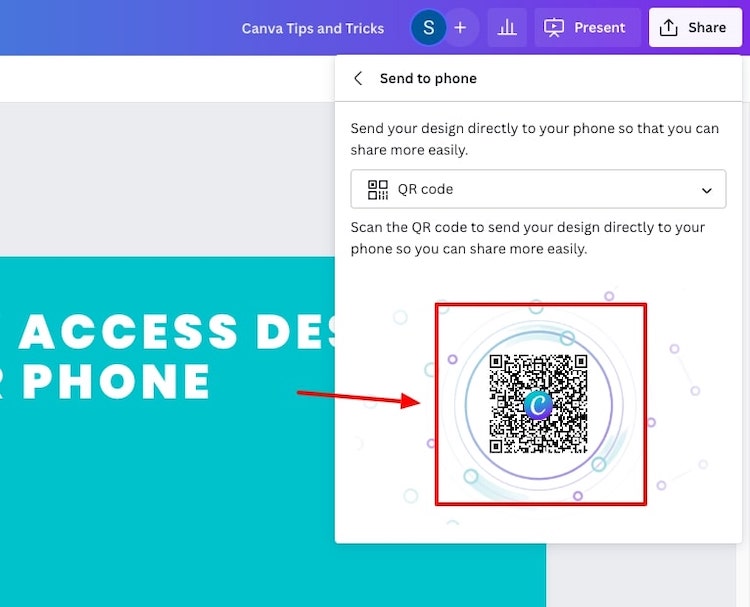
15. Quickly share designs to your phone
If you’re creating a design that you want to quickly share to your mobile (e.g. to upload to Instagram or another platform) you can quickly create a QR code that you can scan with your phone and have that design available on that device straight away.
Here’s how:
- Create a design on your desktop
- Go to ‘Share’ > ‘More’
- Select ‘Send to phone’
- Select QR code
- Scan code with phone
- And now that design is on your mobile!
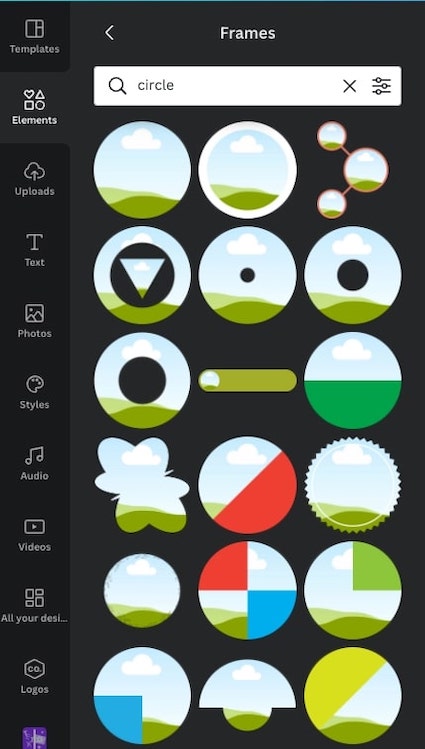
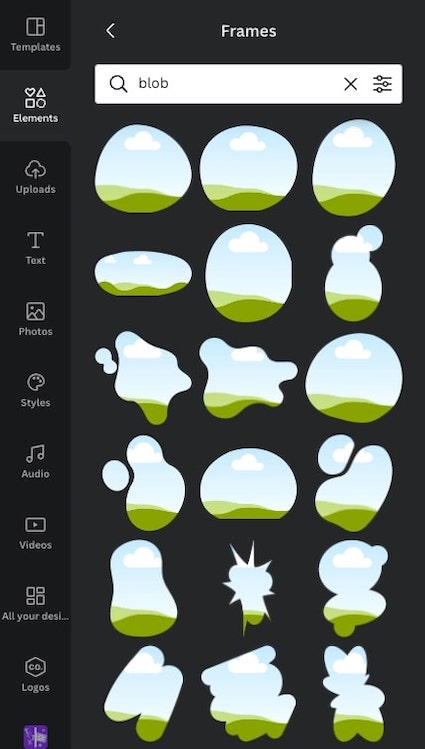
16. Find secret frame elements
You can now search for specific frames in Canva e.g. blob frame, computer frame, browser frame, circle frame, phone frame, etc. – there are now tonnes of frames to choose from.
Just do the following:
- Go to the elements tab
- Go to the ‘Frames’ section
- Put in a search term
Related articles
- How to make a 3D pop out effect with Canva
- Canva letter frames: Custom text masks
- How to create a text mask in Canva
- How to use frames in Canva
- How to make a gradient in Canva
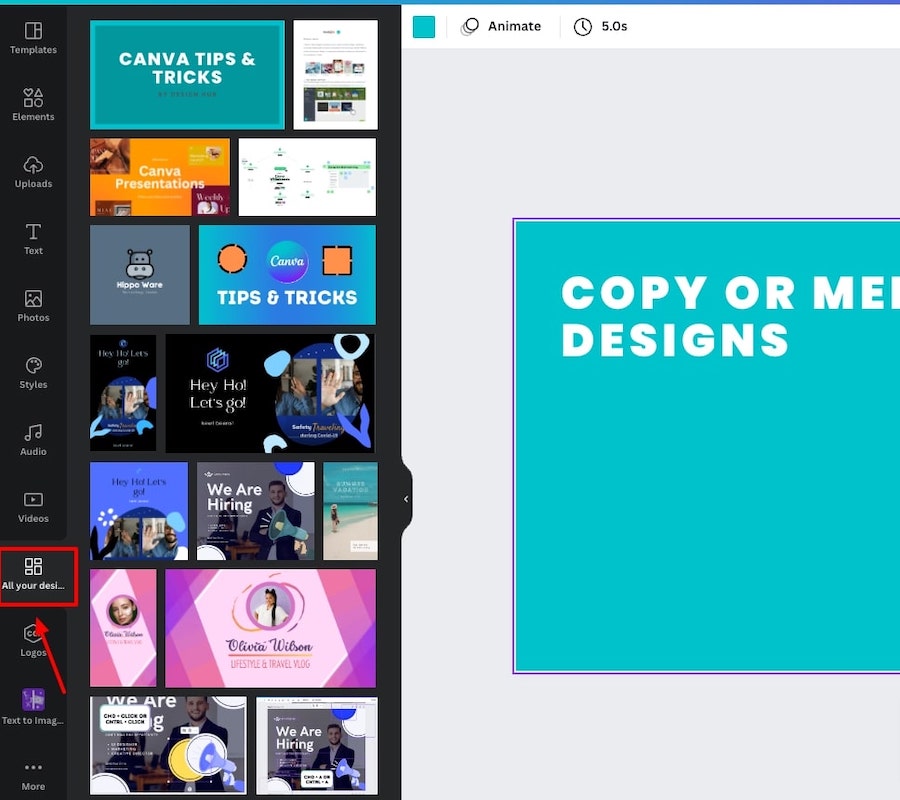
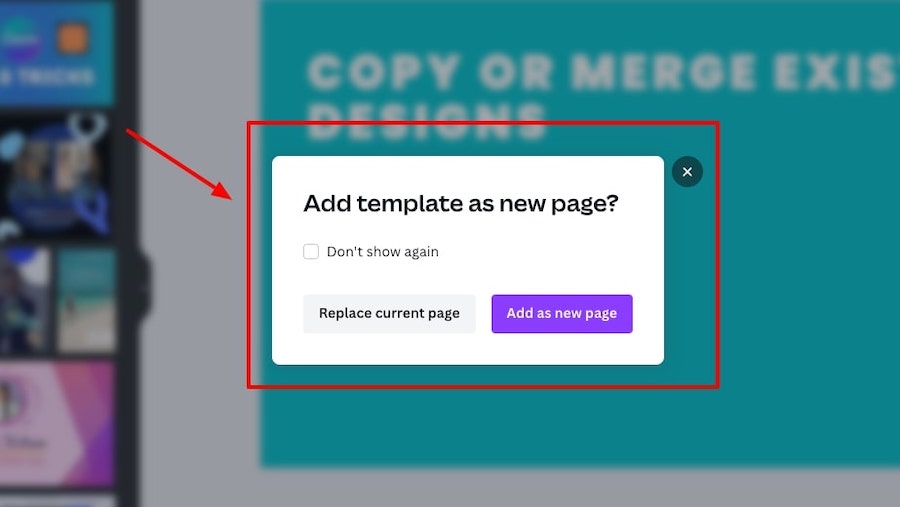
17. Copy or merge existing designs
If you want to copy one or some of your previous designs, or merge designs you can now do this easily within the Canva editor.
Here’s how:
- Go the ‘All your designs’ tab (You may have to add this)
- Add one of your older designs to your new one
- Copy or modify it to go with your new design
If you have another tab open with a Canva design you can also simply copy the elements you want from that (CMD/CTRL + C), go back to the tab with your other Canva design and paste those elements in.
You can also copy and paste whole pages from one design to another by copying the page, then going to the grid view of the design that you want to paste that page in, and paste it in there.
18. Embed social media posts
If you want to embed social media posts in your designs, you can do this easily.
Do the following:
- Go to ‘More’ on the left side panel
- Add the ‘Embeds’ app to your Canva editor
- Paste the URL of the social post you want to embed
- And you’re done
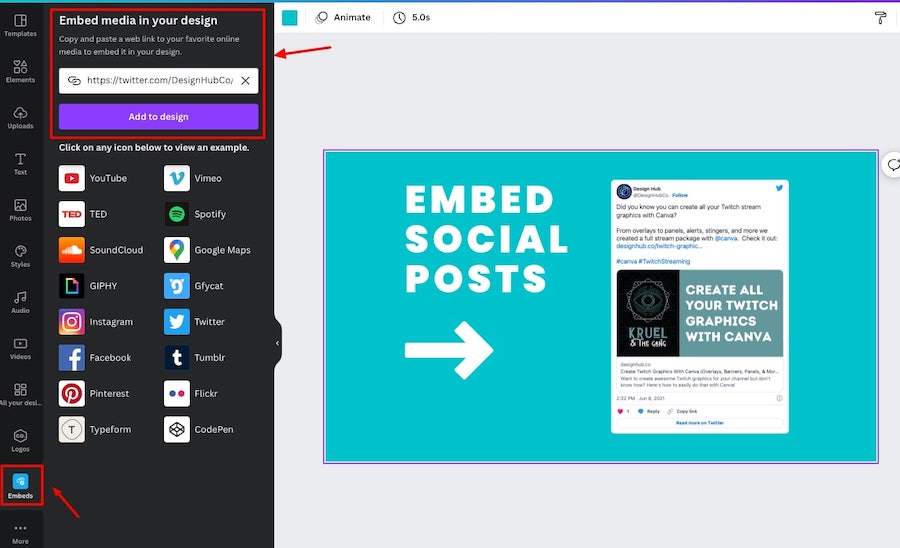
The embedded social post will also be clickable if you share that design online or in a PDF format.
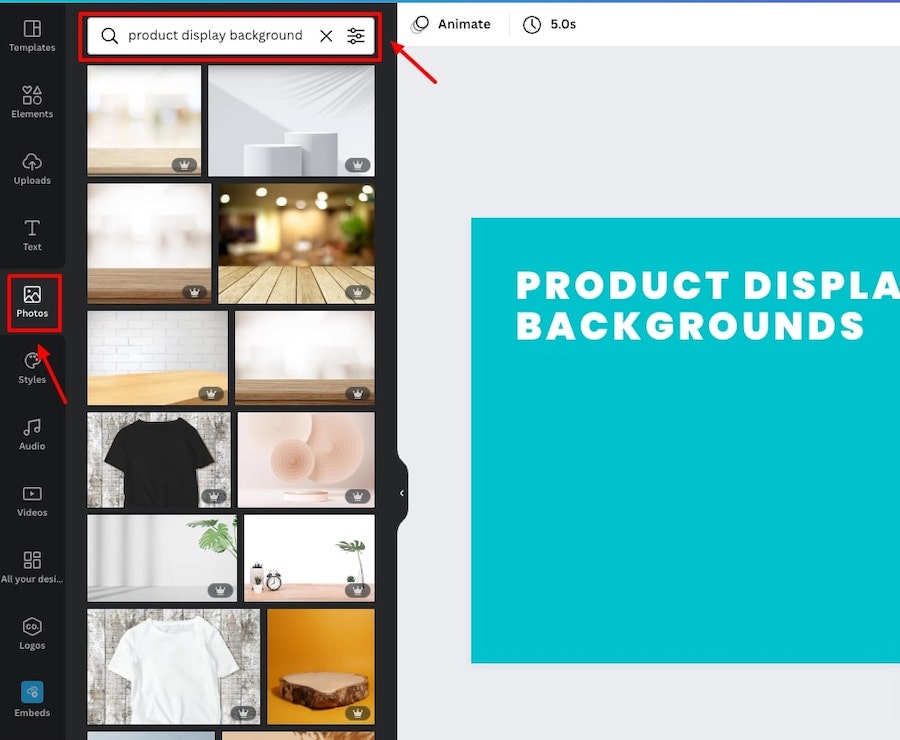
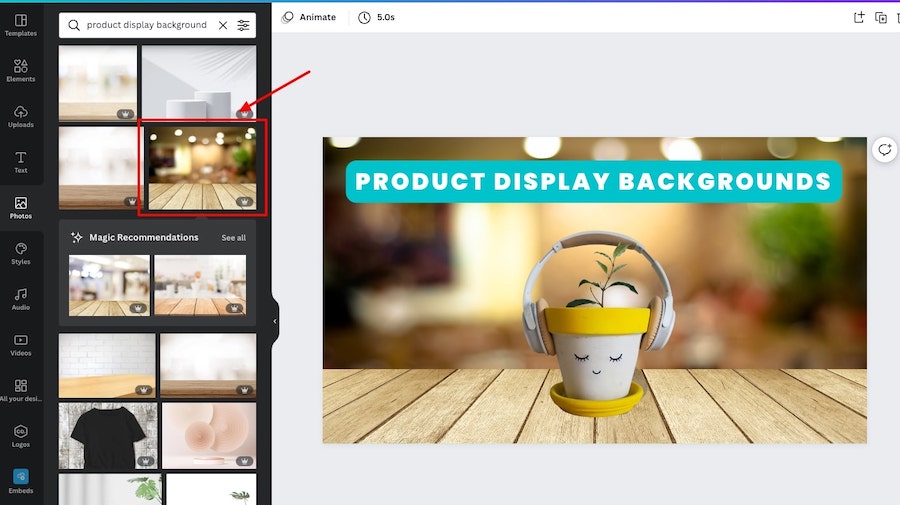
19. Find product display backgrounds
If you sell physical products you can create promotional images for them by searching ‘product display backgrounds’ in the photos tab within Canva.
These allow you to create interesting images to promote your physical products, and can even be perfect for digital ads:
20. Embed your designs on websites/blogs
If you’re selling templates that you’ve designed via Canva or simply want to embed a report or presentation on your website, you can it very Easily.
Here’s how:
- Go to the design you want to embed
- Go to ‘Share’ at the top right of the editor
- Go to ‘More’
- Select ‘Embed’
- Copy the HTML and add it to your site
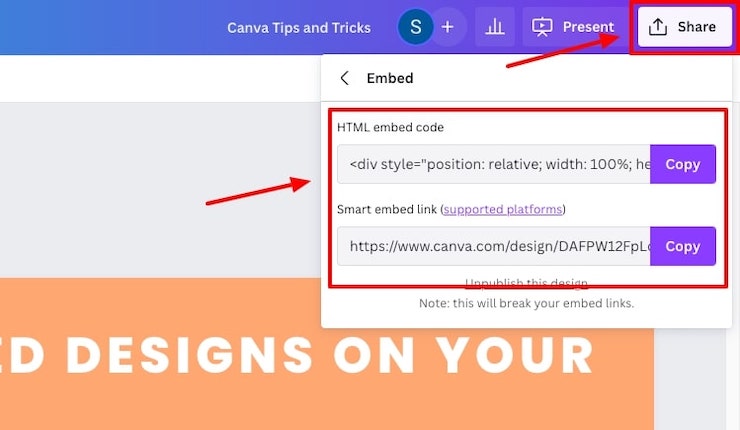
Here’s a presentation we embedded with all the tips and tricks from this article:
21. Use presentation layouts
If you’re create a lot of presentations then this tip is for you.
Canva has a library of presentation layouts that you can now utilize to make creating engaging slides a total breeze.
Here’s how to use them:
- Go to the templates tab in the editor
- Switch to the layouts section
- Chose a layout for your existing page or add a new page
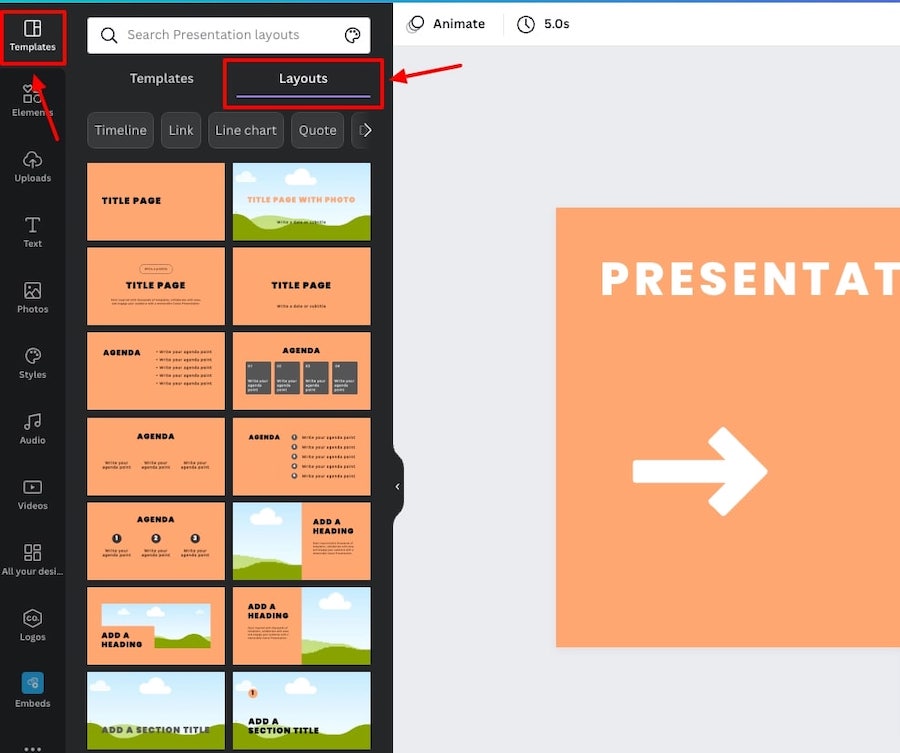
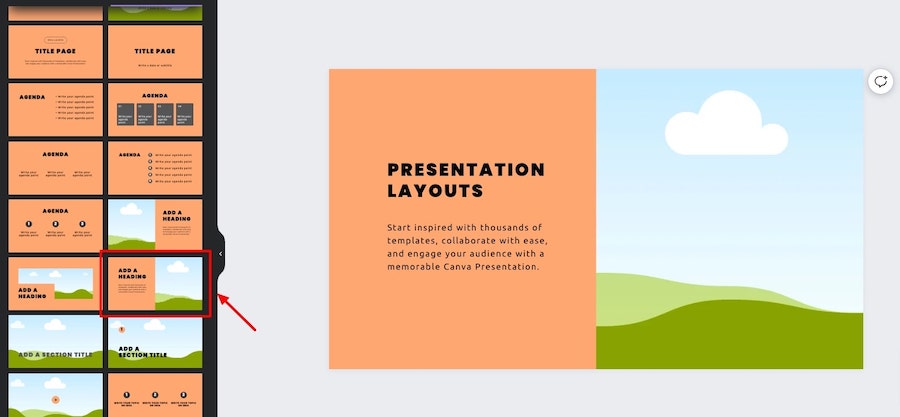
Canva will apply your text and color palette to the layout you select to make things super easy for you.
Speaking of presentations, this article might be of interest: How to convert your Canva slides into PowerPoint presentations.
22. Find more elements by specific creators
If you like the style of the elements from a particular artist or creator on Canva, you can see more of their elements by clicking on the three dots overlay on one of their design elements, and then clicking view more from that creator:

This can be done with photos, audio files, graphics, templates, and more.
We actually used this method to find lots of amazing gradient letters in Canva.
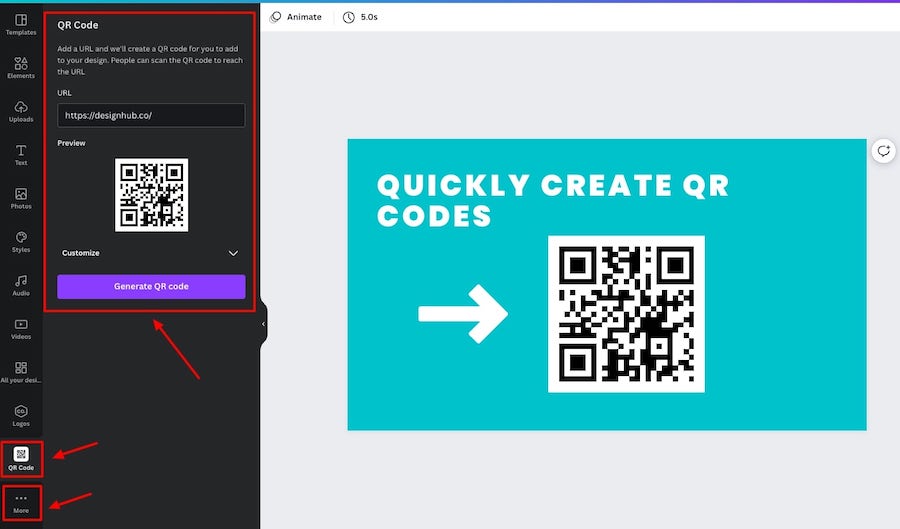
23. Quickly create QR codes
To quickly create QR codes in Canva, here’s what to do:
- Copy the UR that you want the QR code to point to
- In the Canva editor go to ‘More’ via the left side panel
- Find and add the ‘QR code’ app
- Paste the URL
- Click ‘Generate QR Code’
- Now you have a QR code for that URL!
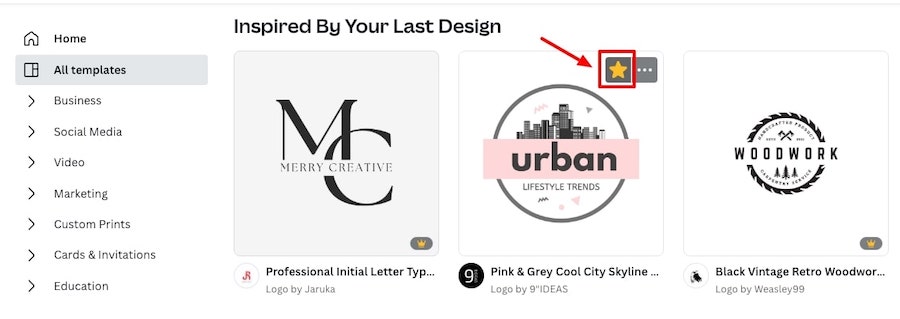
24. Star templates & elements
If you like a template, font, graphic, etc. you can click the the 3 dot overlay on it, click the ‘Star’ button, and that’s it added to your ‘Starred’ folder so you can go back and find your favorites easily.

To find the starred items go to ‘More’ > Folders > Starred folder – and you will see everything you’ve starred.
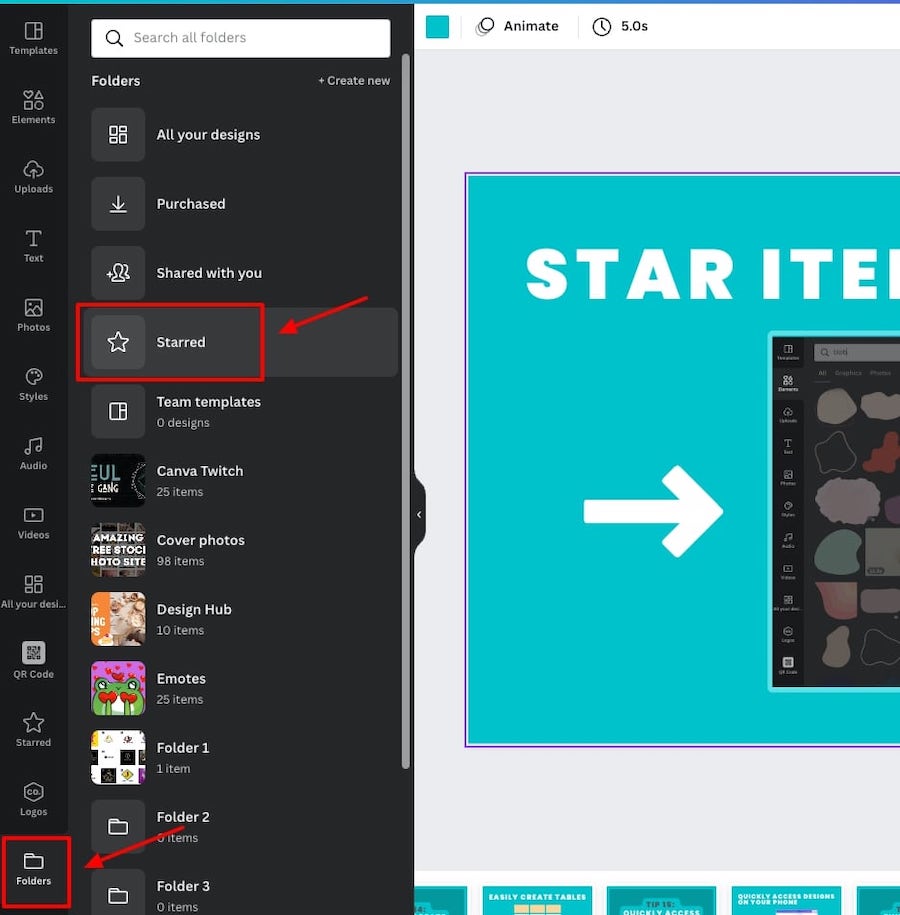
You can do the same from the main Canva area/homepage too by starring templates you like to go back to later.
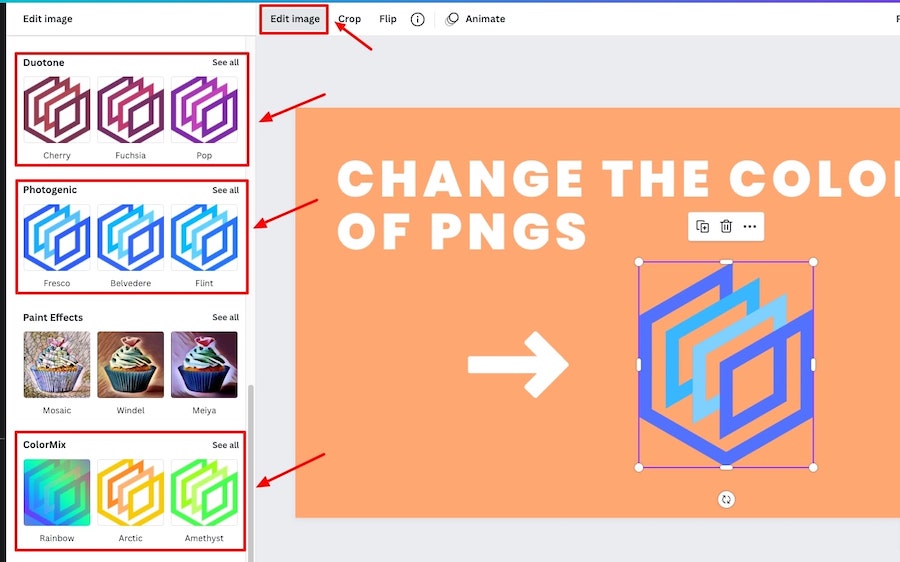
25. Change the colors of PNGs
If you upload a PNG file to Canva such as a logo or add a graphic element that isn’t a vector file you must think that you won’t be able to change the color of that element.
Thankfully, you can and here’s how:
- Select the PNG file in the editor
- Go to ‘Edit image’
- Choose either Duotone, Photogenic, or Colormix
- Choose the new color settings
- Make your adjustments
- Apply the changes
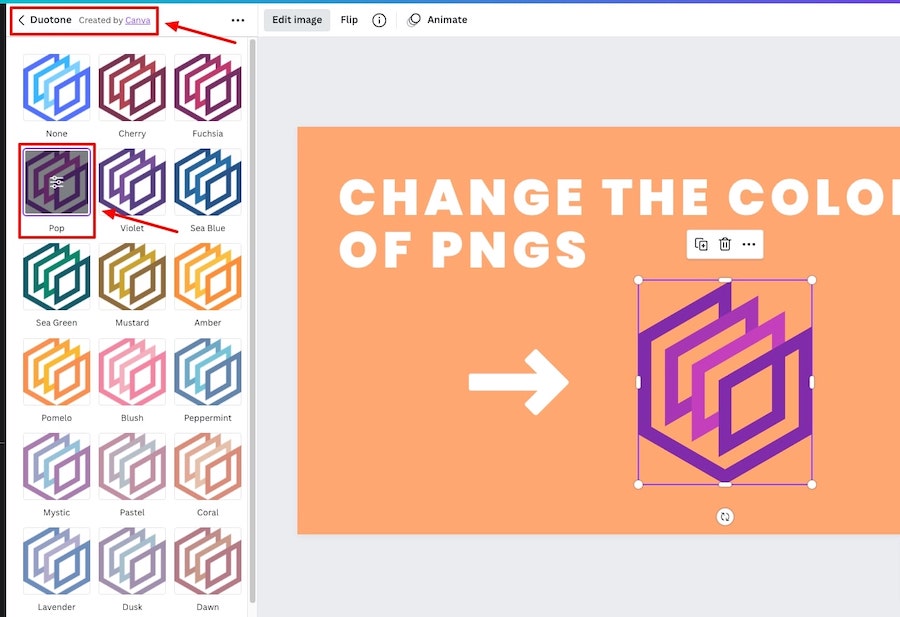
We typically go with Duotone as it seems to get the best results:
Related articles
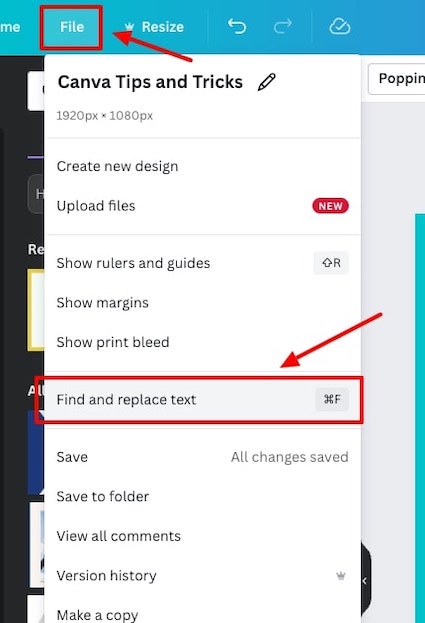
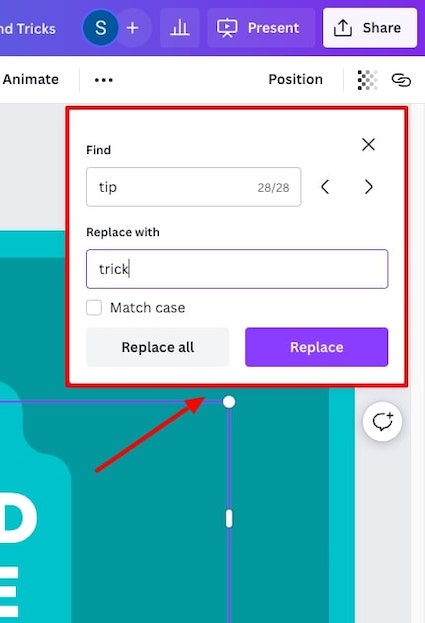
26. Find and replace text
If you’re creating a larger files such as slide presentation you may want to quickly change some of the text within the document (e.g. change all the ‘Tips’ to ‘Tricks’).
To do this, all you have to do is go to ‘file’ and click find and replace, and choose to either replace the words one by one or replace all them at once. It’s as easy as that:
27. Use awesome text effects
Canva is constantly improving and updating most aspects of their product, and this is also the case with their text effects.
You can do quite a few different things to spruce up your text elements. To access the text effects simply select a text element and then click on ‘Effects’ in the top panel:
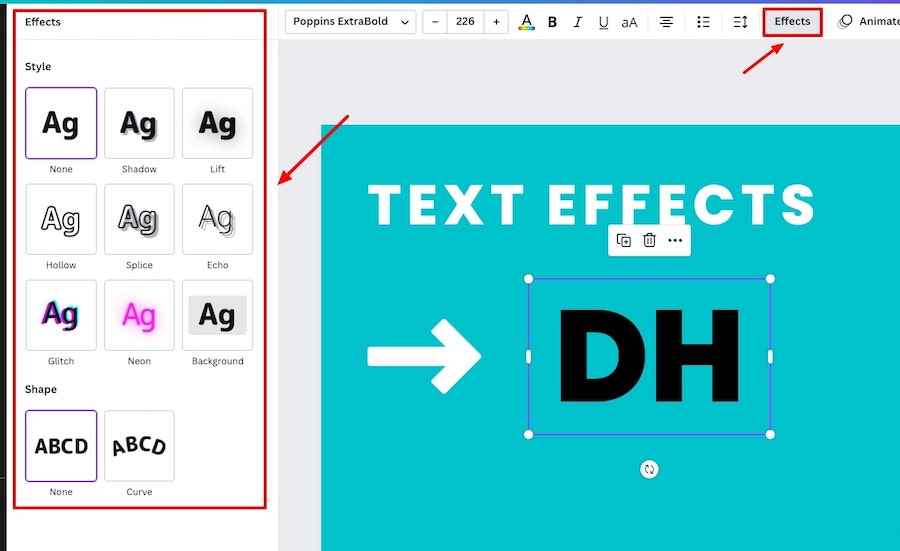
We won’t go through every single text effect, but here are a few of our favorites.
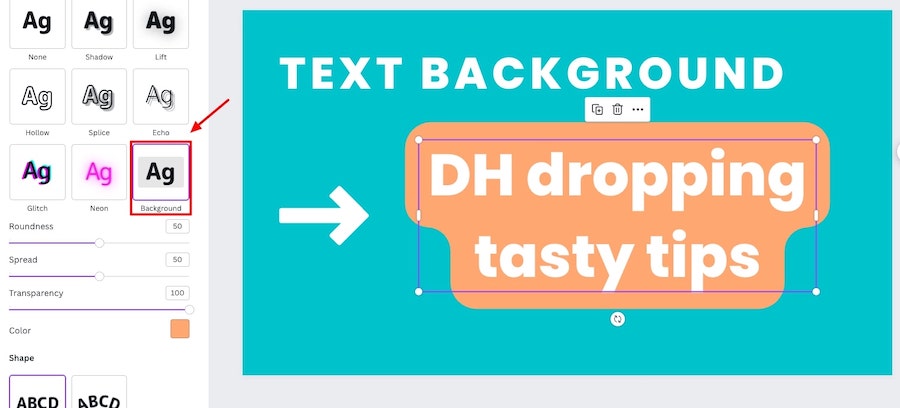
Text background:
You can add a background to a text element, which adjusts perfectly if you add more text to the element or change the size, etc.
It’s a great way to make your text elements:
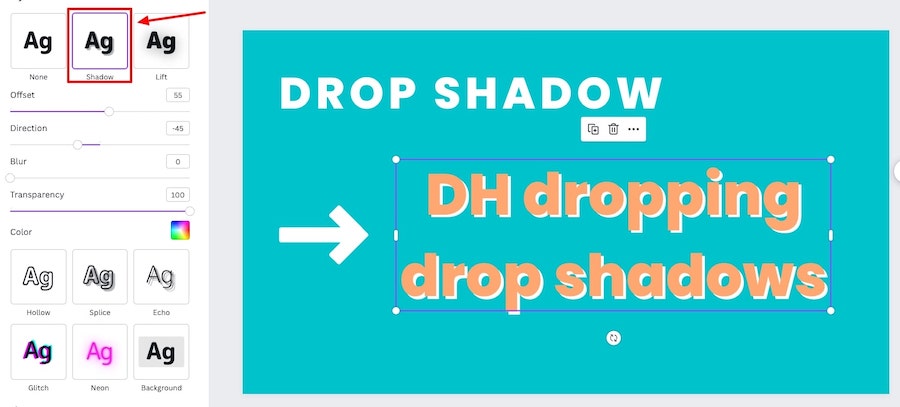
Drop Shadow:
Another great text effect is to add a drop shadow:
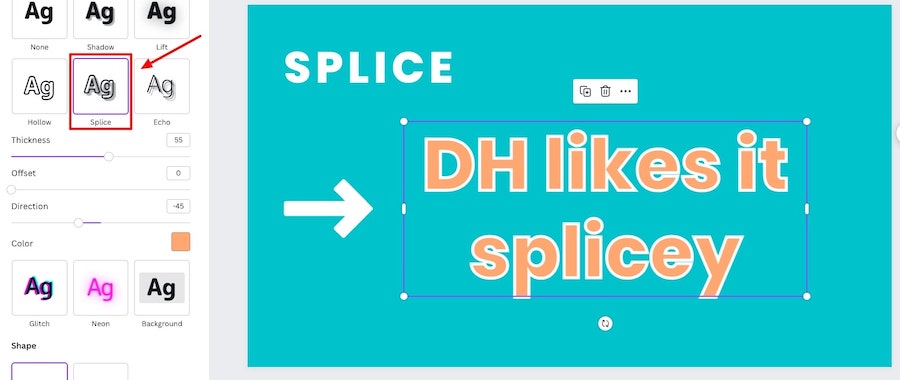
Splice:
To add a border around your text element you can use the splice effect, another great way to help your text element stand out:
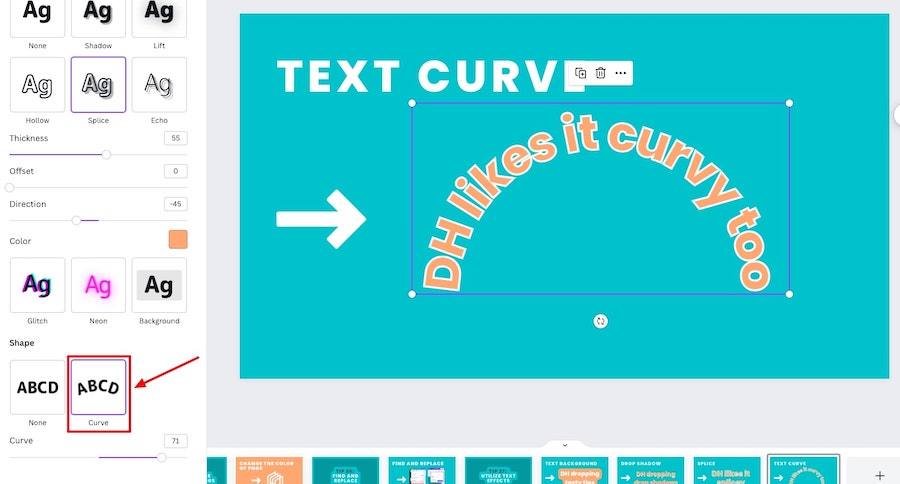
Curved text:
If you want to get a bit creative with your text elements you can also utilize the
Related articles
Final thoughts
So, there you have it, 27 Canva tips, tricks, and hacks to help you up your Canva game!
There’s still so much more that Canva offers than what we were able to over here so make sure you keep investigating the tool to find your own tips and tricks.
If you’re brand new to Canva, you should read this article: How to use Canva. It covers everything a beginner needs to know.
Enjoy creating! Oh, and if you have any questions, comments, or have suggestions for other awesome Canva tips, tricks, or hacks, leave a comment below!